
- What is the Early Learning Gateway?
- How to Access the Early Learning Gateway Service Portal
- Welcome to the Early Learning Gateway Service Portal
- View and Manage Your Waitlist
- View and Edit Your Service Information
- Manage Staff
- ECE Substitute
- Your Profile
- How to Change Your Password
- Resources
- Contact Us
- Forgot Your Password
- How to Sign Out of the Early Learning Gateway?
Please note: The visuals in this guide display the Early Learning Gateway when accessing it on a computer. The appearance of the screen may vary when accessed on a mobile device, or tablet.
What is the Early Learning Gateway?
The Early Learning Gateway is an online platform to improve access to early learning and child care in Newfoundland and Labrador.
The Early Learning Gateway parent portal provides parents/guardians seeking child care the ability to:
- search for regulated child care services, and
- add their child(ren) to waitlists
The Early Learning Gateway service portal provides regulated child care services the ability to:
- view and manage the list of parents who added child(ren) to their waitlist in the Early Learning Gateway, and
- create and manage Early Learning Gateway accounts for admin staff
- view the list of ECEs who are registered as an ECE substitute in the Early Learning Gateway
New features will be added in the near future to further support access to high-quality, affordable, and inclusive early learning and child care in the province.
How to Access the Early Learning Gateway Service Portal
Initial Login
Child Care Licensees or Family Child Care Providers:
Please check your email for a message titled ‘Early Learning Gateway Service Portal Account’ from the Department of Education. Follow the instructions below to create an account. If you did not receive an email, please send a request to elgateway@gov.nl.ca, including your name and the name of your child care service.
Administrators:
Please contact the child care licensee at your child care service to request an account.
Once you receive an email from the child care licensee, follow the steps below to create an account.
How to Redeem your Code
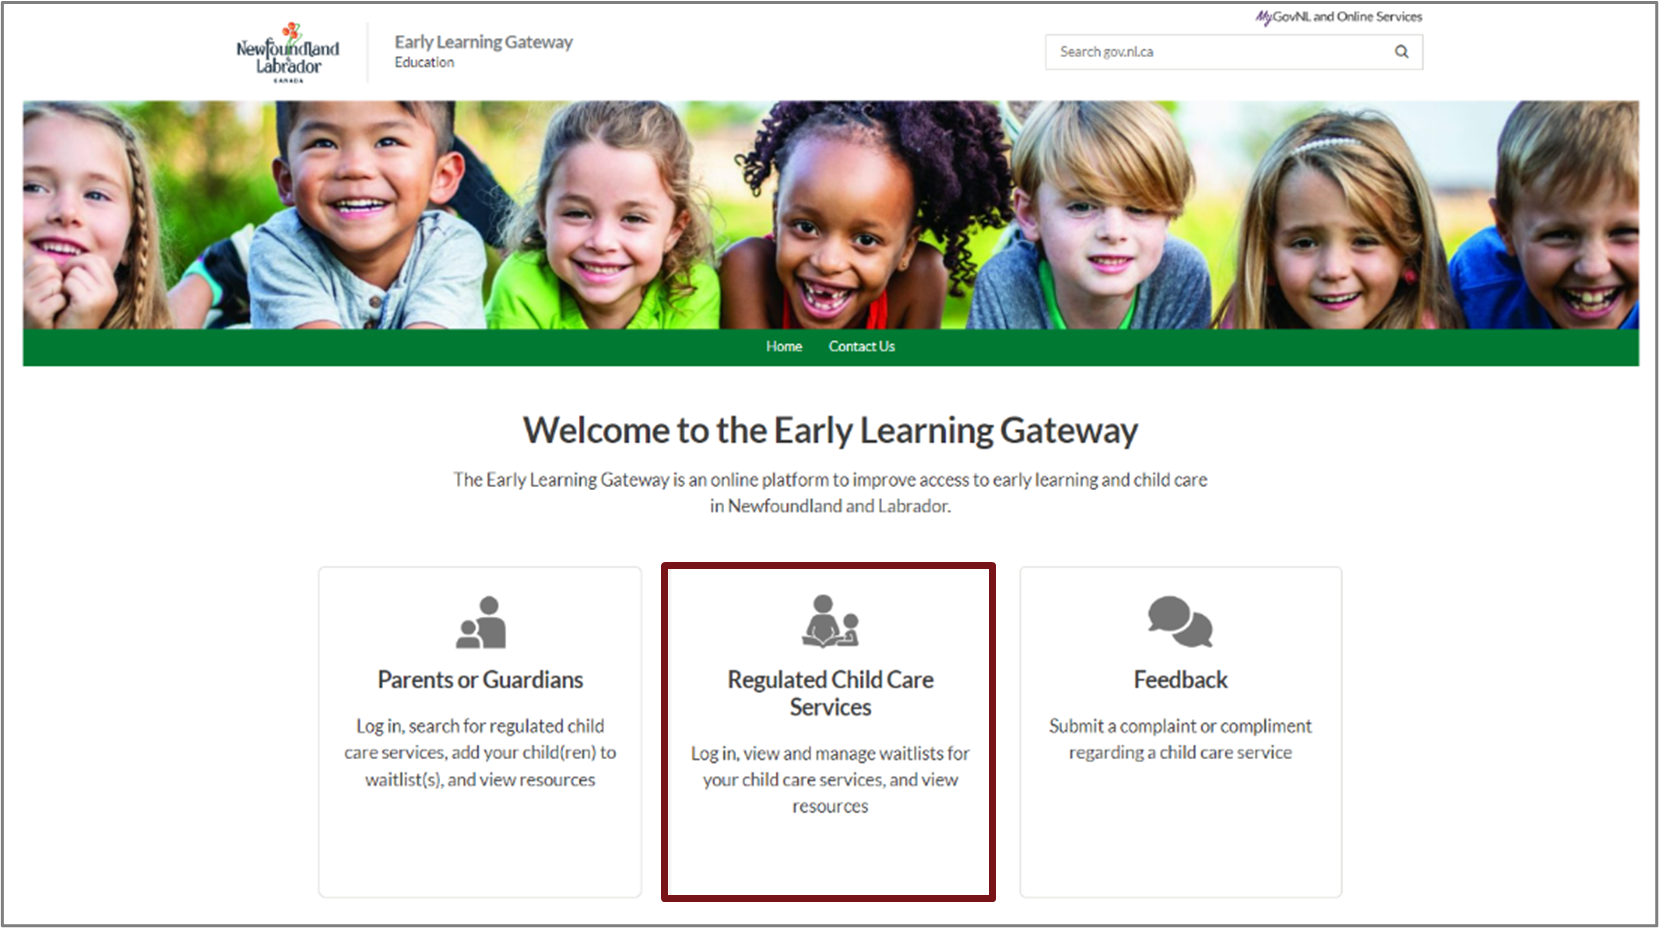
To access the Early Learning Gateway service portal, visit the Early Learning Gateway and click Regulated Child Care Services.
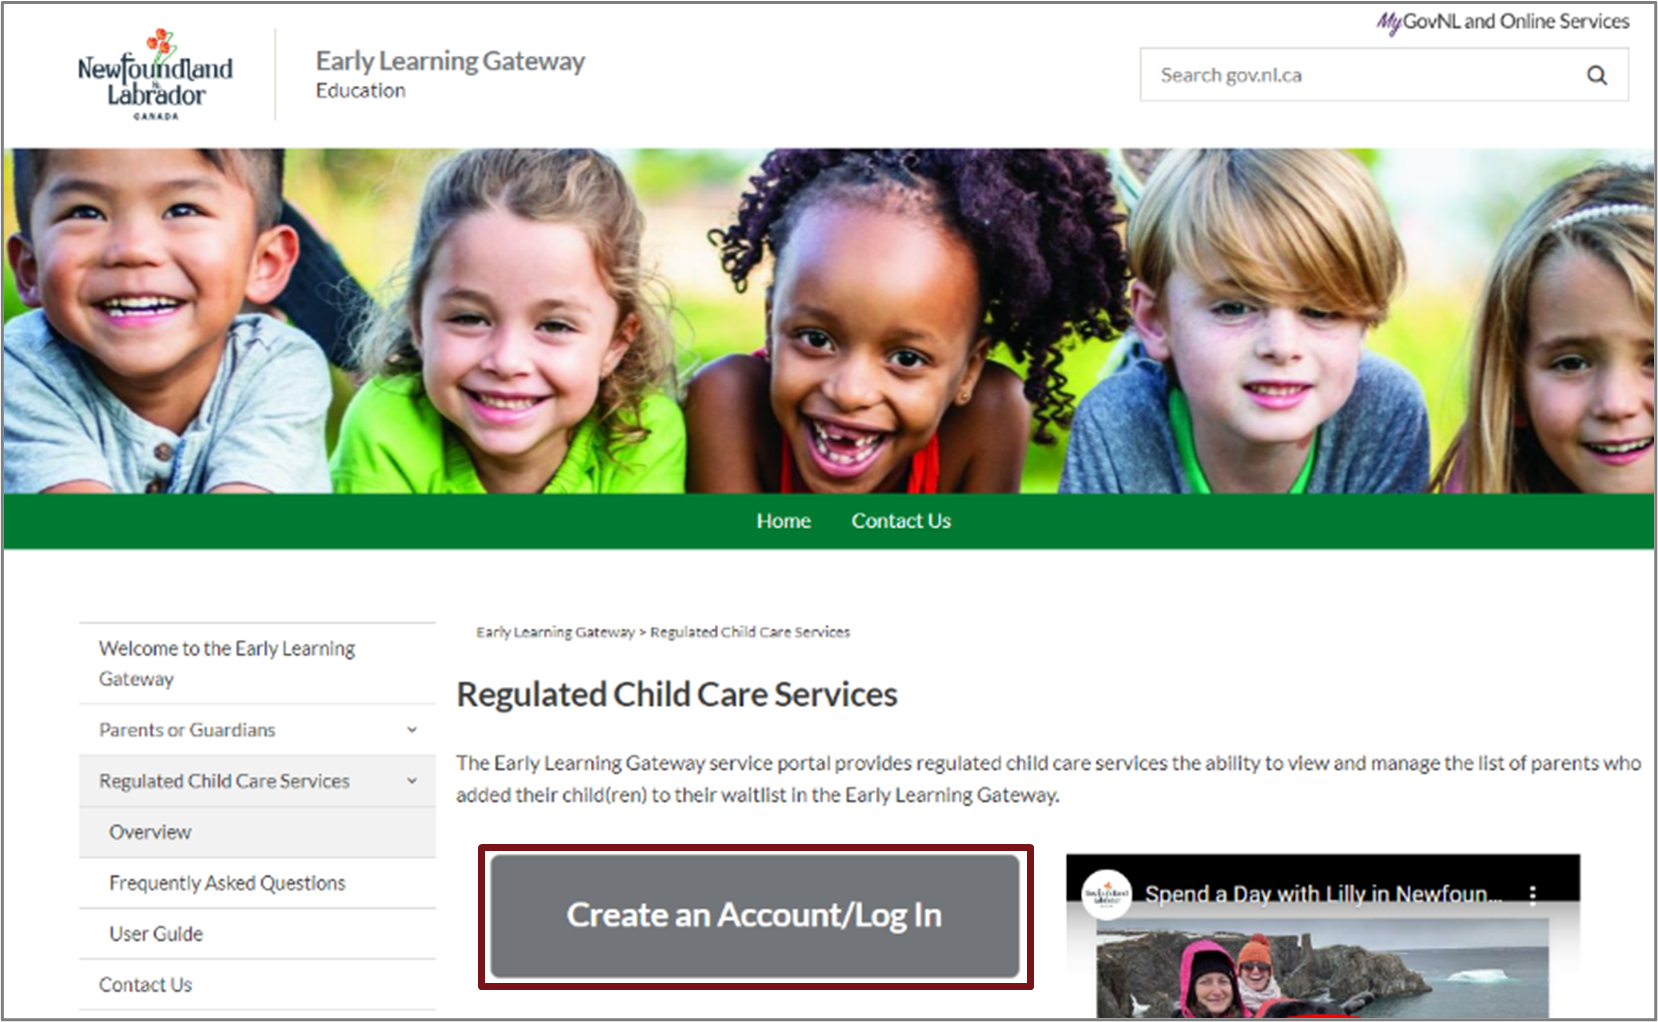
Then, select Create an Account/Log In.
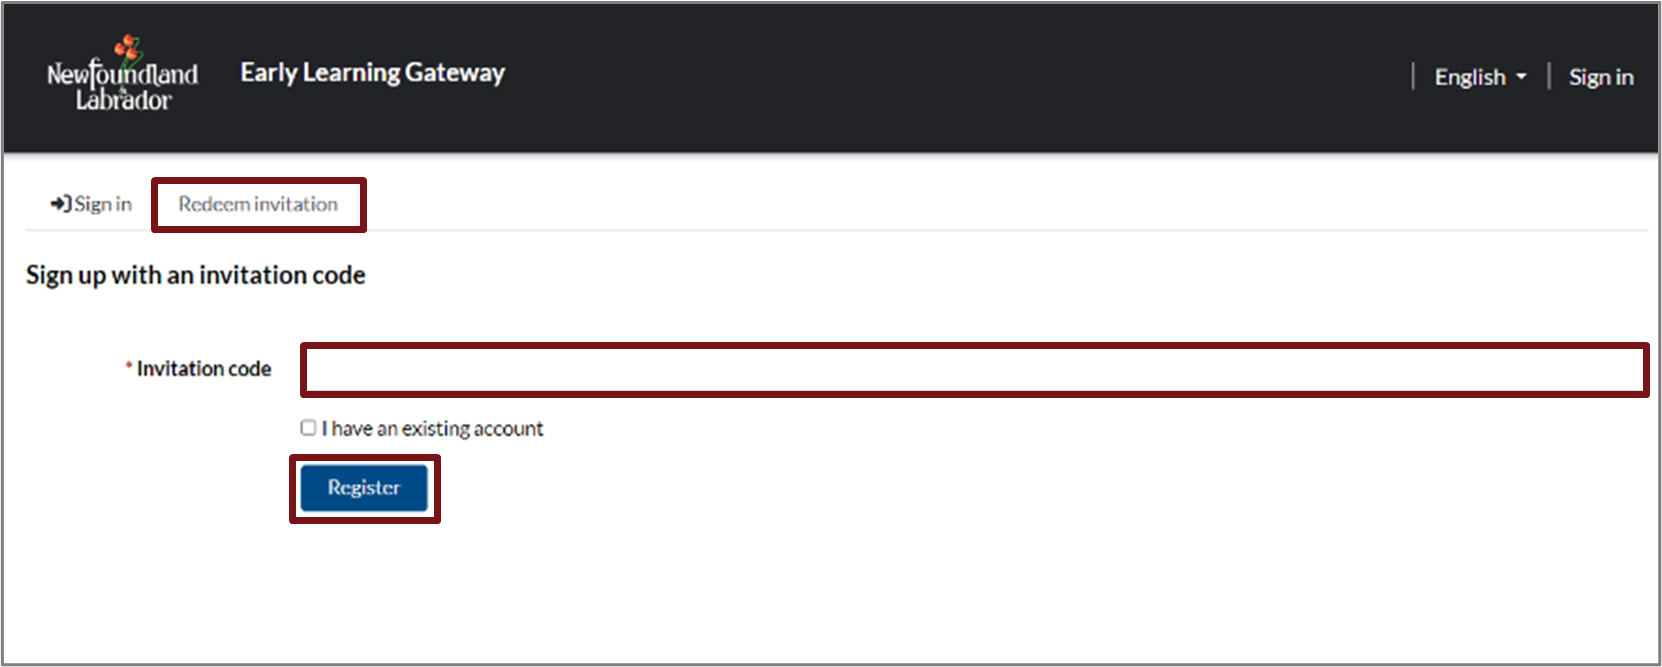
On the login screen, click the Redeem invitation tab. Enter the Invitation code that you received via email, then click Register.
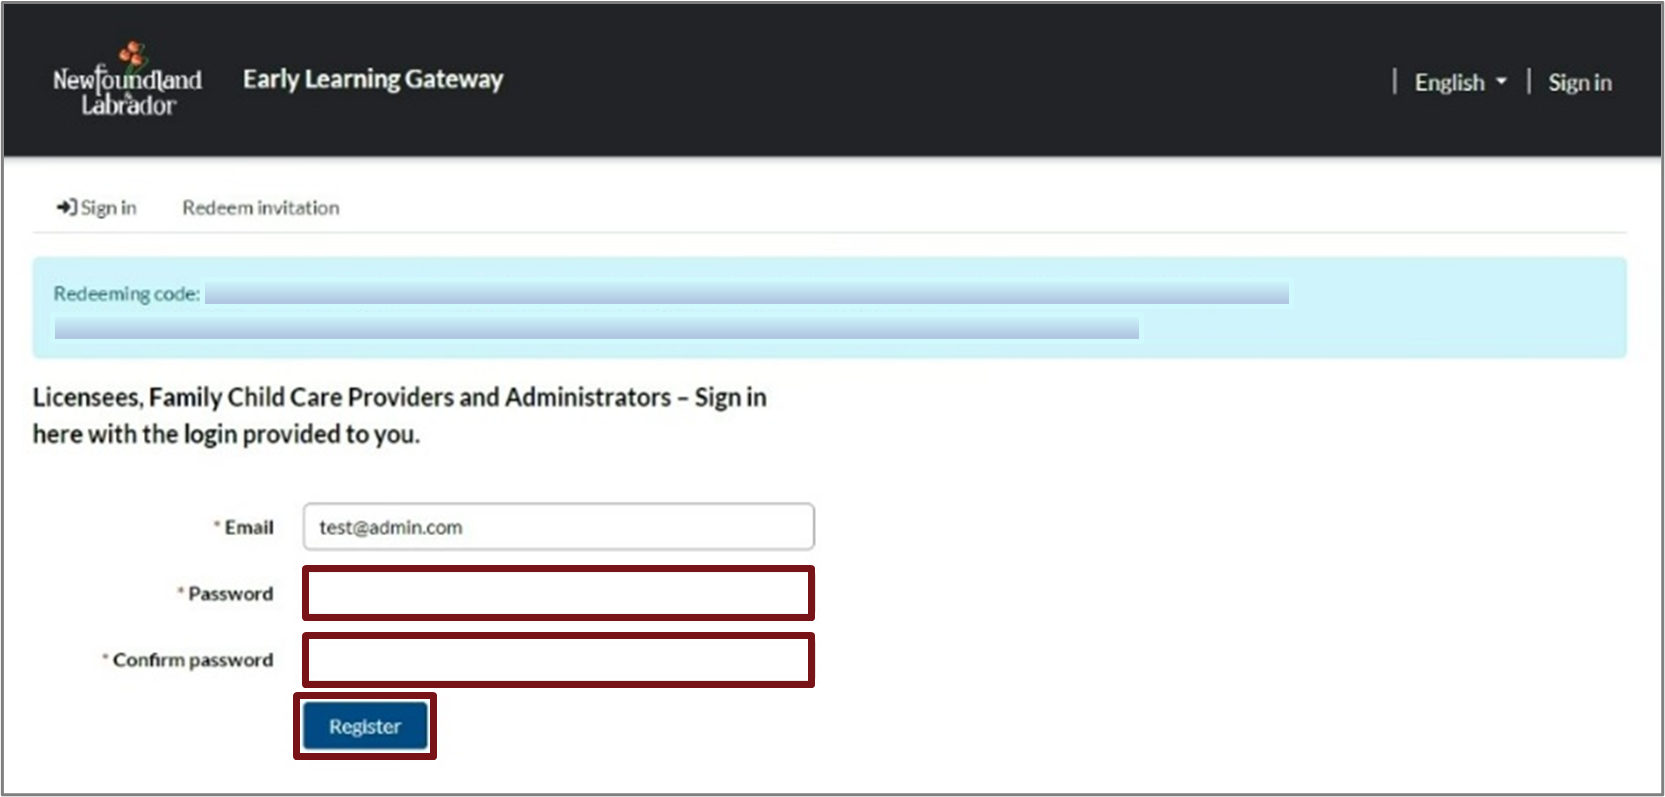
You will need to create a password. Then, click Register.
Updating Your Profile
After redeeming your code, you will be directed to update your profile. Complete the applicable fields then click update.
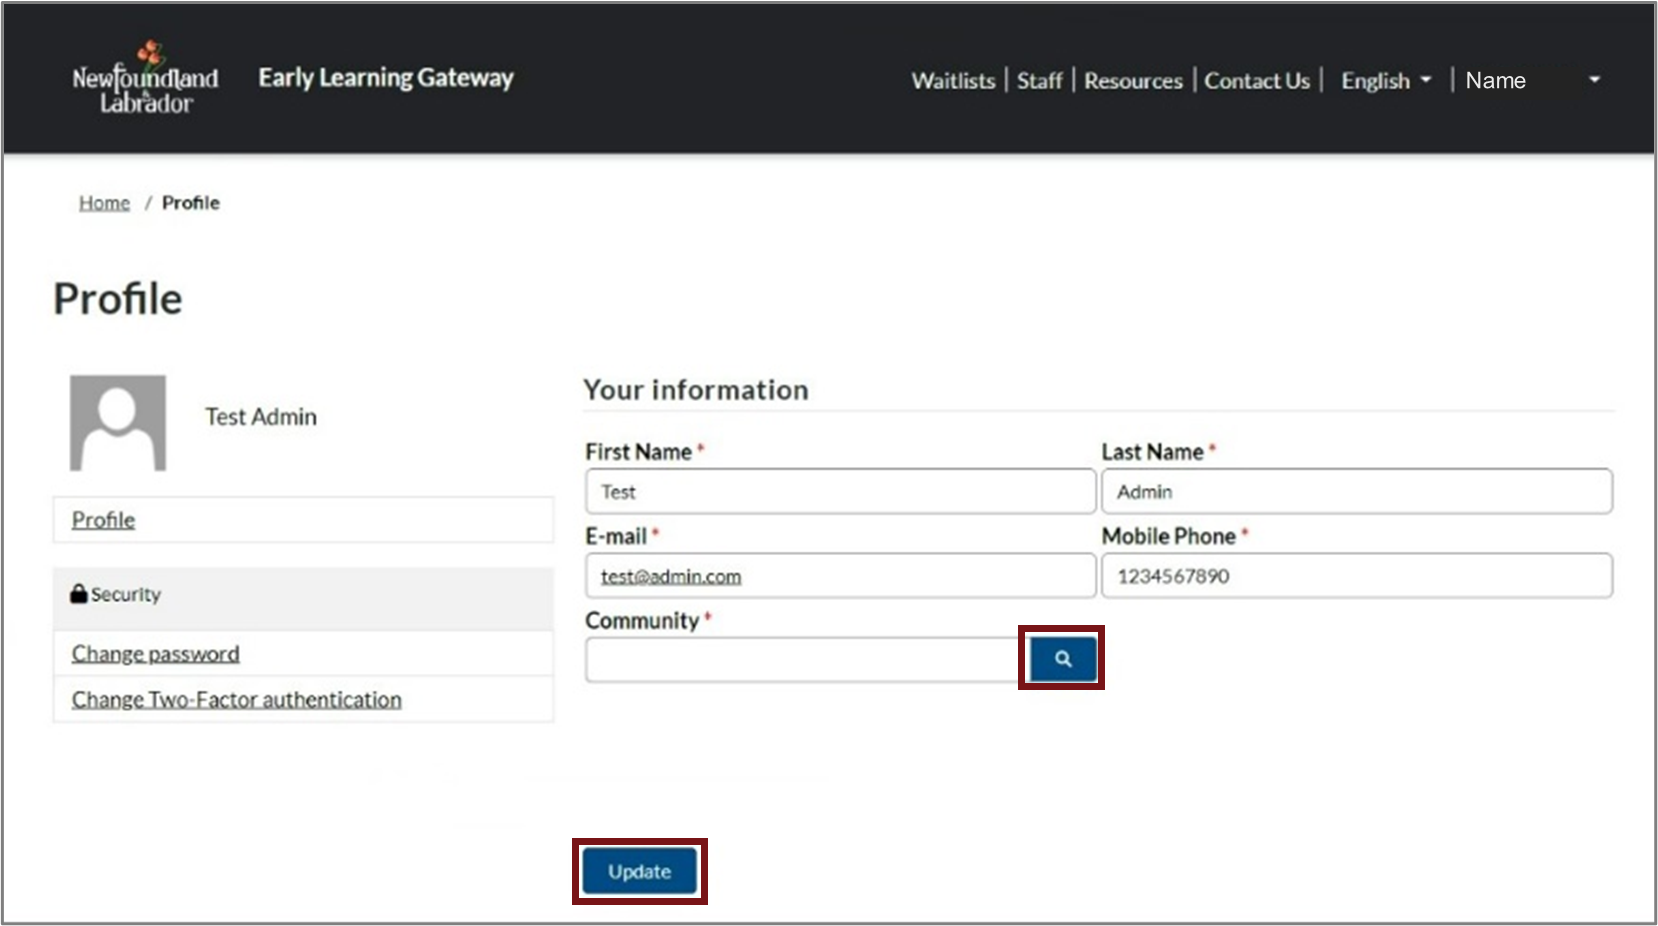
Please note: To add your community you will have to click the magnifying glass and select your community.
Updating Your Services
Upon initial login, you will be required to update the details of your service. Please see View and Edit Your Service Information.
Please note: This step must be completed for the service to become visible to parents, allowing them to add their child to your waitlist.
Subsequent Logins
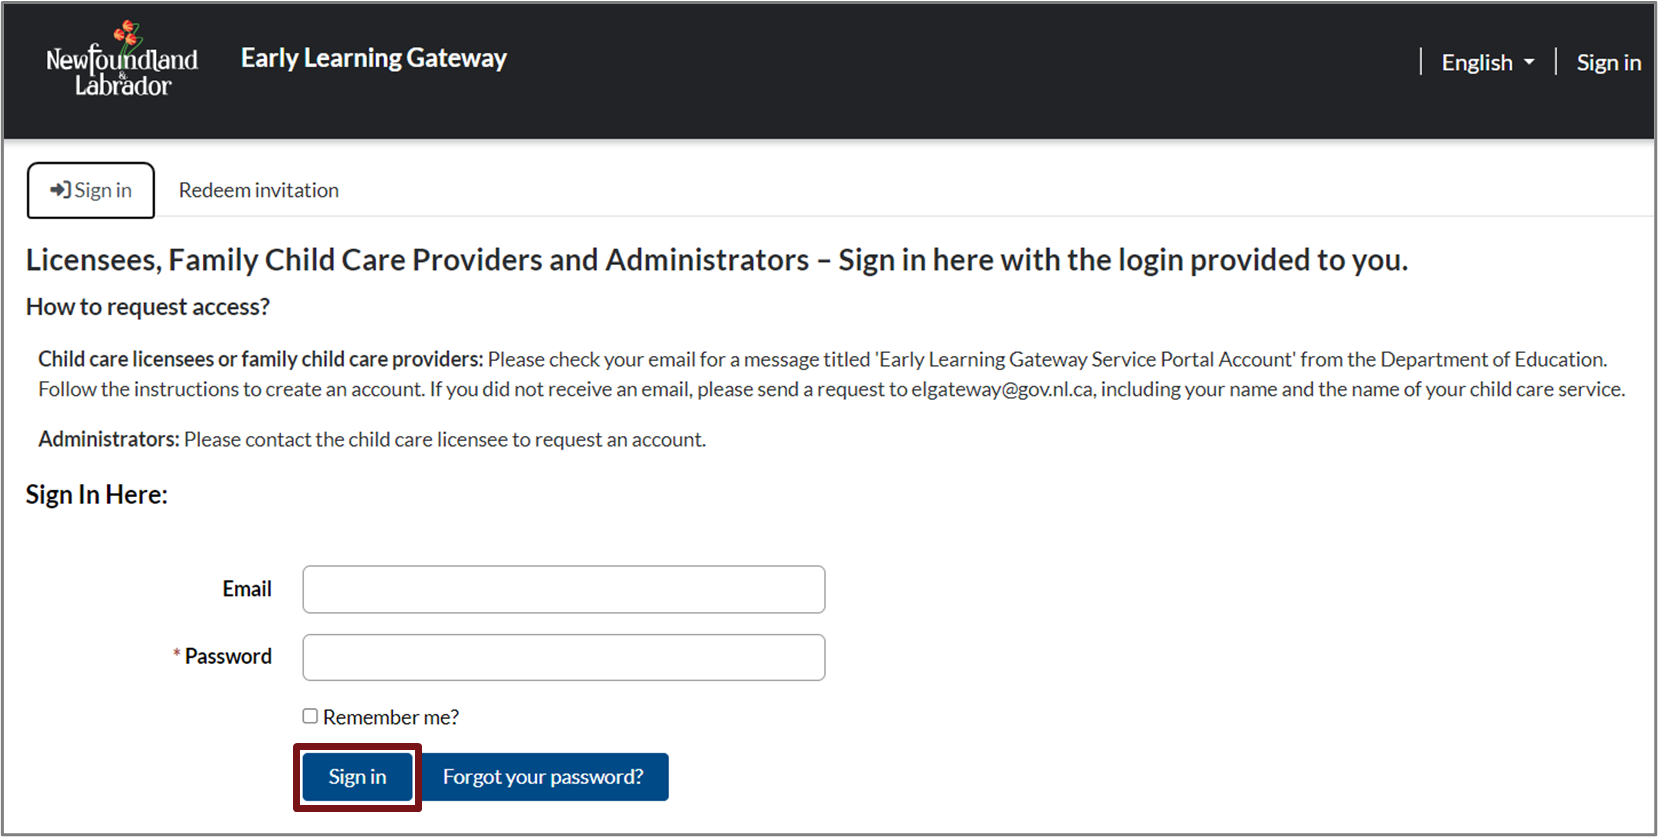
After your account creation and initial login has been completed, you can sign into the Early Learning Gateway service portal by visiting the Early Learning Gateway. Click Regulated Child Care Services.
Then, select Create an Account/Log In.
Next, you will see an Early Learning Gateway Service Portal Sign in screen. Enter your email and password, then click Sign in.
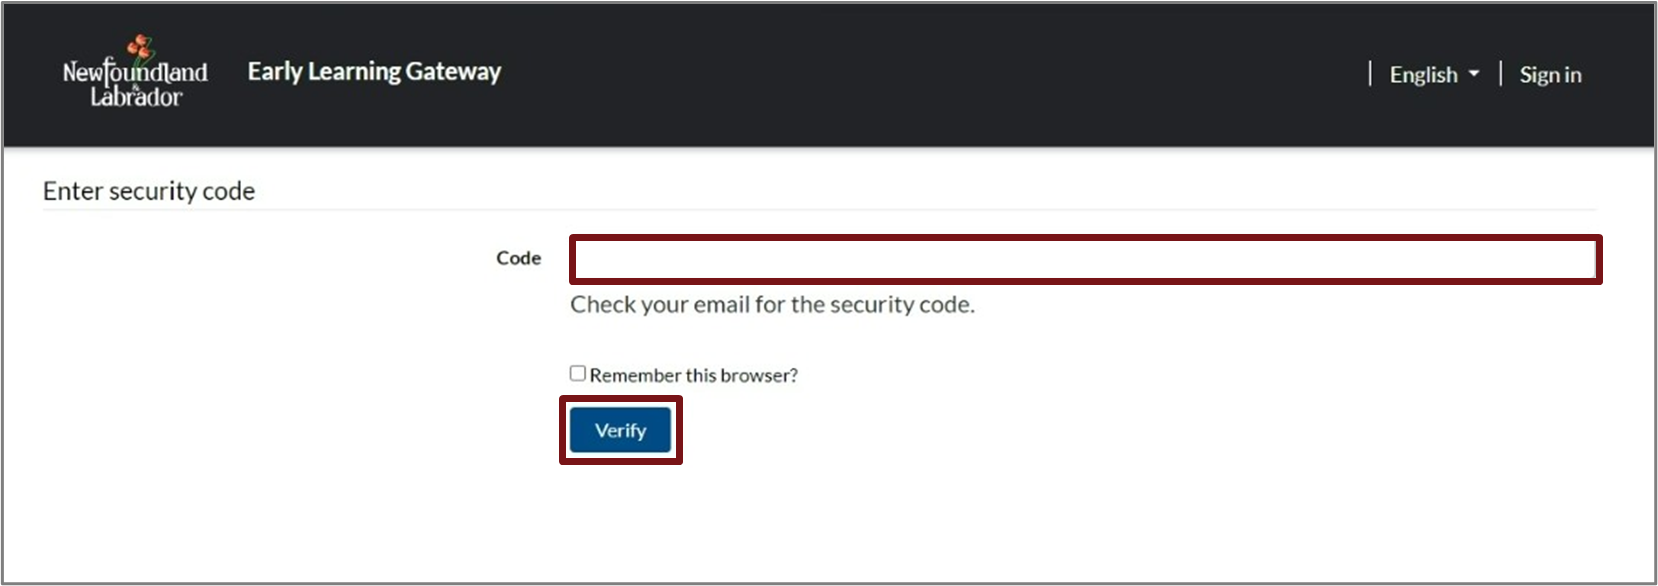
Two Factor Authentication
Once you enter your email and password, you will be prompted to enter a security code that will be sent to your email. Check your email, then enter the code. Click Verify.
Welcome to the Early Learning Gateway Service Portal
Once you sign into the Early Learning Gateway Service Portal, you will have ability to:
- view and manage the list of parents/guardians who added their child(ren) your waitlist in Early Learning Gateway
- view parent/guardian contact information to follow up when a space becomes available
- create and manage Early Learning Gateway account access for your admin staff
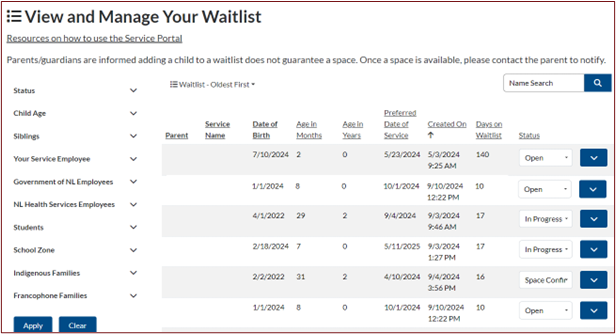
View and Manage Your Waitlist
Click Waitlists at the top of the Early Learning Gateway Service Portal. The View and Manage Your Waitlist section will display. The list of parents/guardians who added their child(ren) to your waitlist through the Early Learning Gateway will appear here.
If using a mobile device, click the menu icon ![]() at the top right of the screen, then select Waitlists.
at the top right of the screen, then select Waitlists.
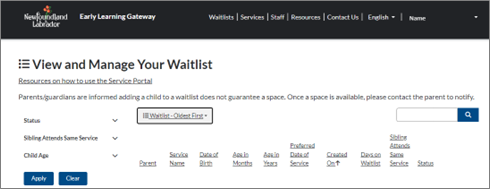
View Waitlist
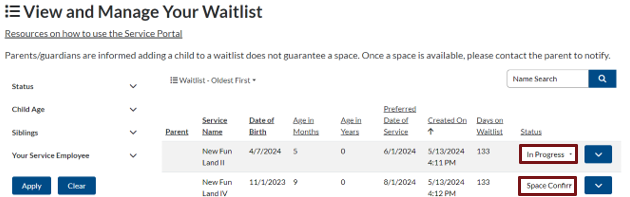
You can organize the waitlist by selecting options from the drop-down box, Waitlist – Oldest First, or Waitlist – Newest First. Additionally, you can sort it by clicking on any of the waitlist headings.
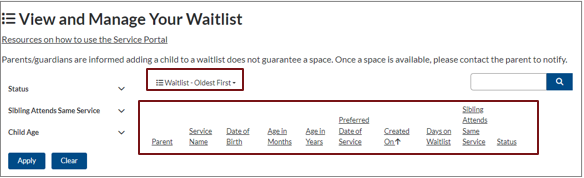
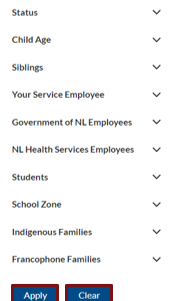
You also have filter options to customize the current view of your waitlist and make it easier to manage. You can filter by Status, whether Sibling attends same service and Child Age. Once you select your preferred filter options, click Apply.
Manage Waitlist
To manage the status of a waitlist entry, you can choose one of the following options:
Option 1 – Update a Single Waitlist Entry Click the down arrow for a waitlist entry and select Manage.
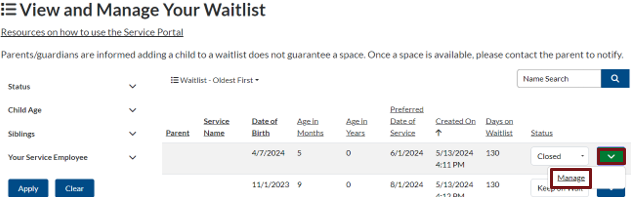
An Edit Waitlist Details window will open.

- Update the Waitlist Status by selecting the applicable option from the drop-down menu:
- Open: Newly added waitlists seeking child care
- In Progress: Contacting the parent/guardian when a space is available
- Keep on Waitlist: Parent did not accept child care space and requested to stay on your waitlist
- Space Confirmed: Parent accepted child care space
- Closed Space Not Accepted: Parent did not accept child care space and did not request to stay on your waitlist
- Closed Does Not Meet Priorities: Does not meet the child care service priorities
- Closed No Response: Unable to contact parent
- Select a response from the High Importance drop-down menu. If you choose Yes, you can filter and view the waitlist by High Importance when managing the waitlist.
- View the Parent Details section to find the parent’s contact information. Reach out to them directly by telephone or email to discuss available space at your service.
- Use the Notes section to type any necessary details.
- Click Save and close.
Please note:
- Waitlist status and notes are for your service use only. If you email a parent/guardian, please exclude personal or health information.
- Use the Space Confirmed status after you have contacted the parent, and they have confirmed acceptance of the space.
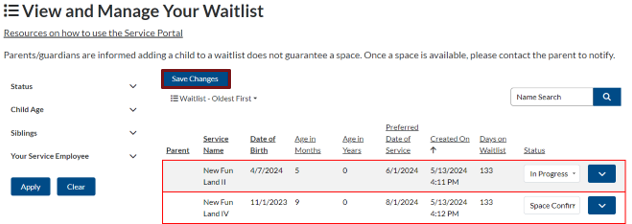
Option 2 – Update Multiple Waitlist Entries
Under the Status heading, update the Waitlist Status by selecting the applicable option from the drop-down menu for each waitlist entry you wish to update:
-
- Open: Newly added waitlists seeking child care
- In Progress: Contacting the parent/guardian when a space is available
- Keep on Waitlist: Parent did not accept child care space and requested to stay on your waitlist
- Space Confirmed: Parent accepted child care space
- Closed Space Not Accepted: Parent did not accept child care space and did not request to stay on your waitlist
- Closed Does Not Meet Priorities: Does not meet the child care service priorities
- Closed No Response: Unable to contact parent
After changing the waitlist status, the entries will display with a red border. Once completed, click Save Changes. Then, your waitlist will appear with the updated status.
View and Edit Your Service Information
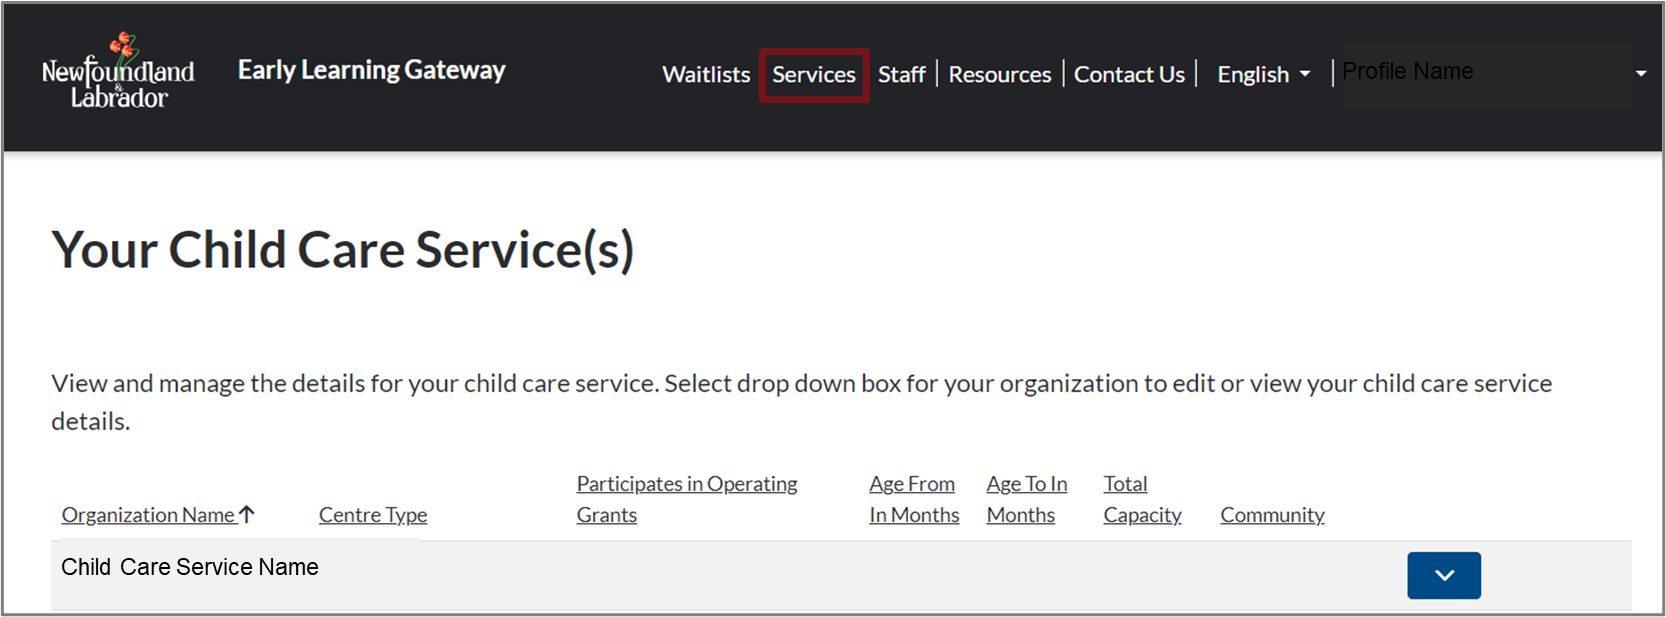
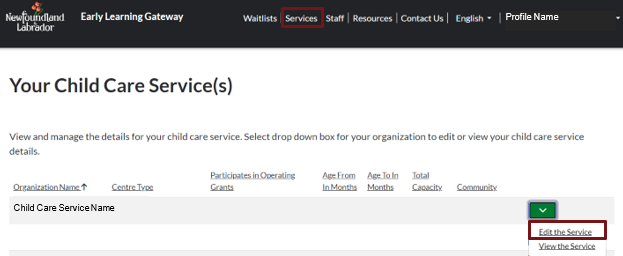
Licensees and administrators can view and manage details for the service by clicking Services at the top of the Service Portal window. You will see any child care services that you manage under the Your Child Care Service(s) section.
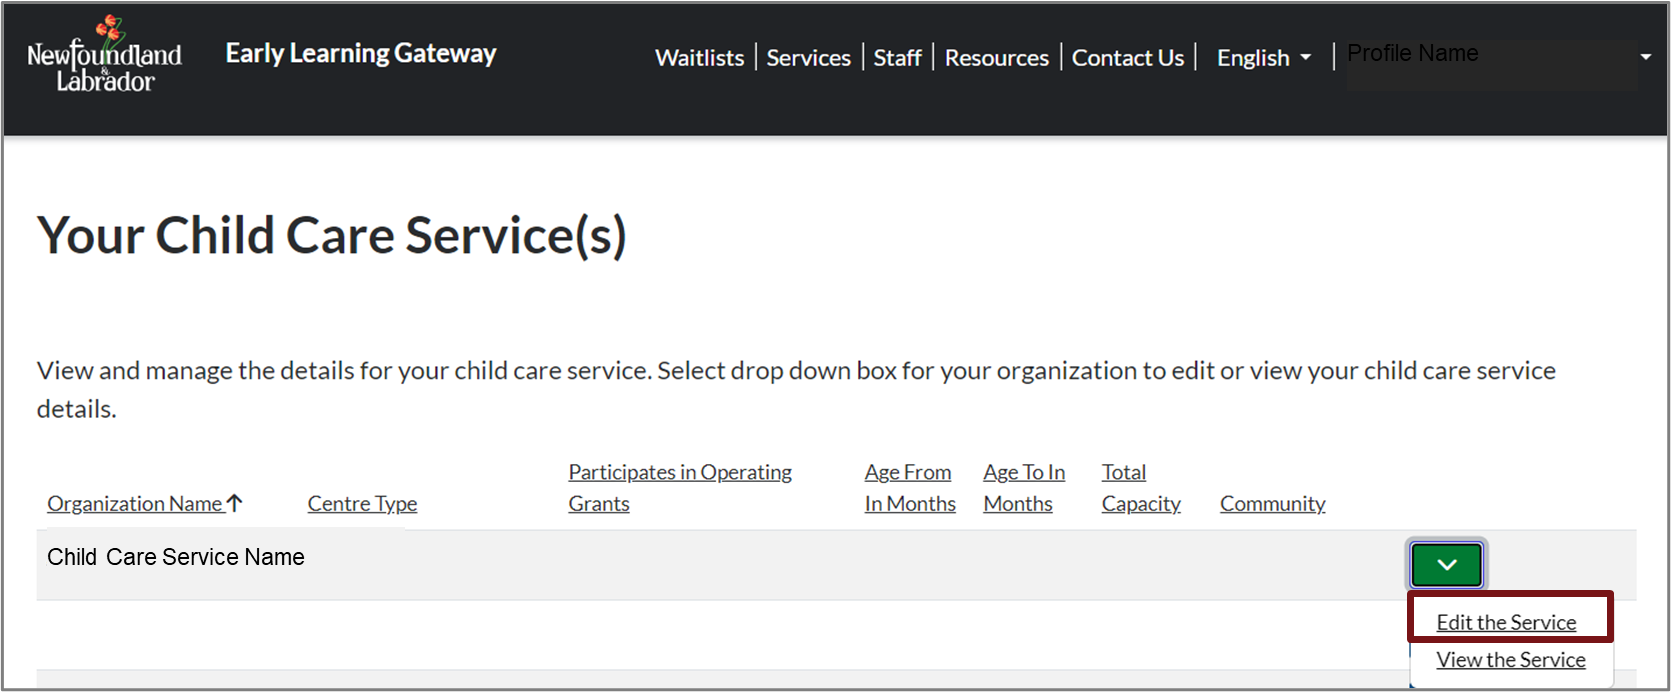
To edit your service details, click the down arrow for the service and select Edit the Service.
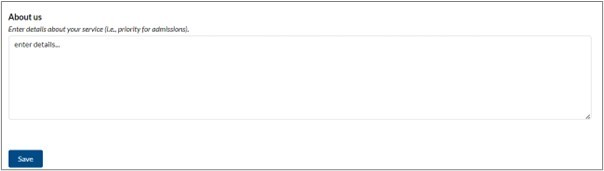
Please update the required sections by choosing from the dropdown menu for each field. Further information, such as waitlist priority or hours of operations for your service, can be added in the About us field.
New services joining the Early Learning Gateway must complete the mandatory questions to become visible to parents, allowing them to add their child to your waitlist. The parent or guardian will then be able to view this information when they search for services through the parent portal.
Once completed, scroll down, and click the Save button.
Please note: Child care services managing their existing waitlist can choose to set the Waitlist Position Visible to Parents field to either Yes or No. If you select Yes, the waitlist position will be visible to parents/guardians in the Early Learning Gateway Parent Portal. For new services joining the Early Learning Gateway, this field cannot be changed and will be set to Yes.
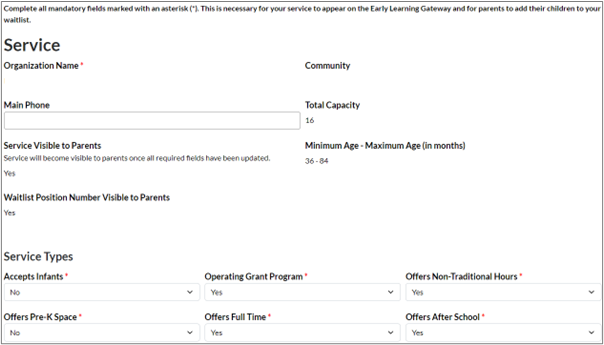
Please note: If you are missing details for your service, you will see the following notification at the top of your screen if you are missing details for your service.

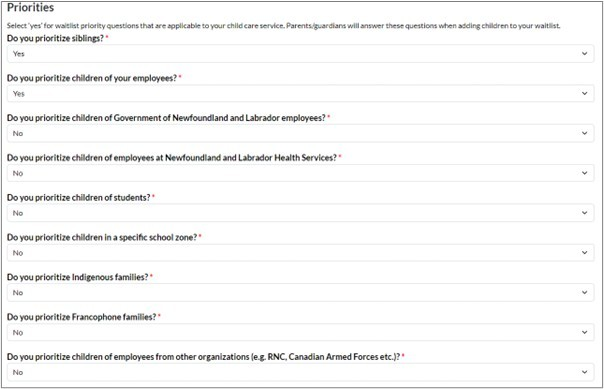
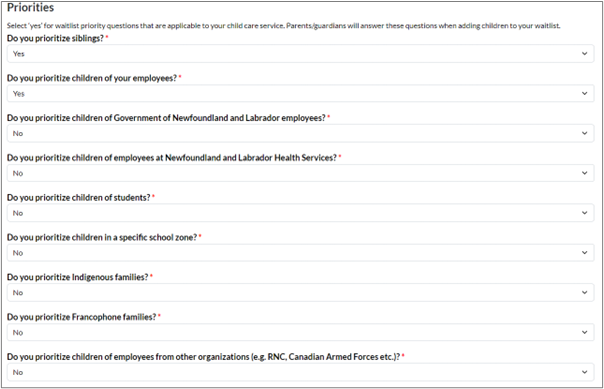
Priority Questions
Child care services can choose from a selection of priority questions for parents/guardians to answer when adding their children to the waitlist, if applicable to the service. These questions are optional but can assist in managing the waitlist more effectively.
In the Edit the Service section, navigate to Priorities where you will find a list of questions. For each question, use the drop-down menu to select one of the two available options:
- Select Yes if the question is applicable to your child care service. Parents/guardians will answer these questions when adding children to your waitlist.
- Select No if the question is not applicable to your child care service.
Once completed, scroll down, and click the Save button.
Please note: If you choose to use or update the priority questions for your service, some parents/guardians may have already added their child to your waitlists before you selected Yes to a question. As a result, they will receive a notification in the Early Learning Gateway Parent Portal to answer the questions for your service. While the parent/guardian will appear on your waitlist, they may not show up in your search results when using the filter option until they respond to the questions.
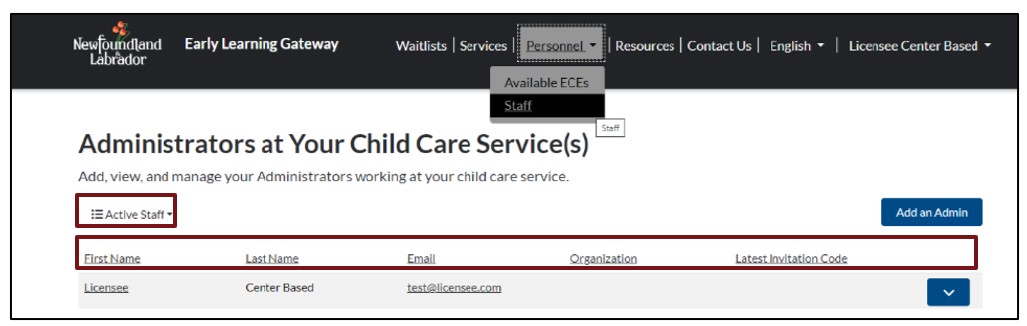
Manage Staff
Click the Personnel button at the top of the Early Learning Gateway Service Portal, then select Staff. The Administrators at Your Child Care Service(s) section will display. Child care licensees will be responsible for adding and managing administrator accounts within the Early Learning Gateway Service Portal.
Please note: Family child care providers will not see the staff option within the Early Learning Gateway service portal.
If using a mobile device, click the menu icon ![]() at the top right of the screen, select Personnel, then select Staff.
at the top right of the screen, select Personnel, then select Staff.
You can organize your staff by selecting from the drop-down box, Active Staff, or Inactive Staff. Additionally, you can sort it by clicking on any of the headings.
Add an Admin Account
If you have an administrator responsible for managing your child care service waitlist, you can add an admin account and send them an invitation to create a username and password for the Early Learning Gateway Service Portal. To add an administrator to your staff, select Add an Admin.
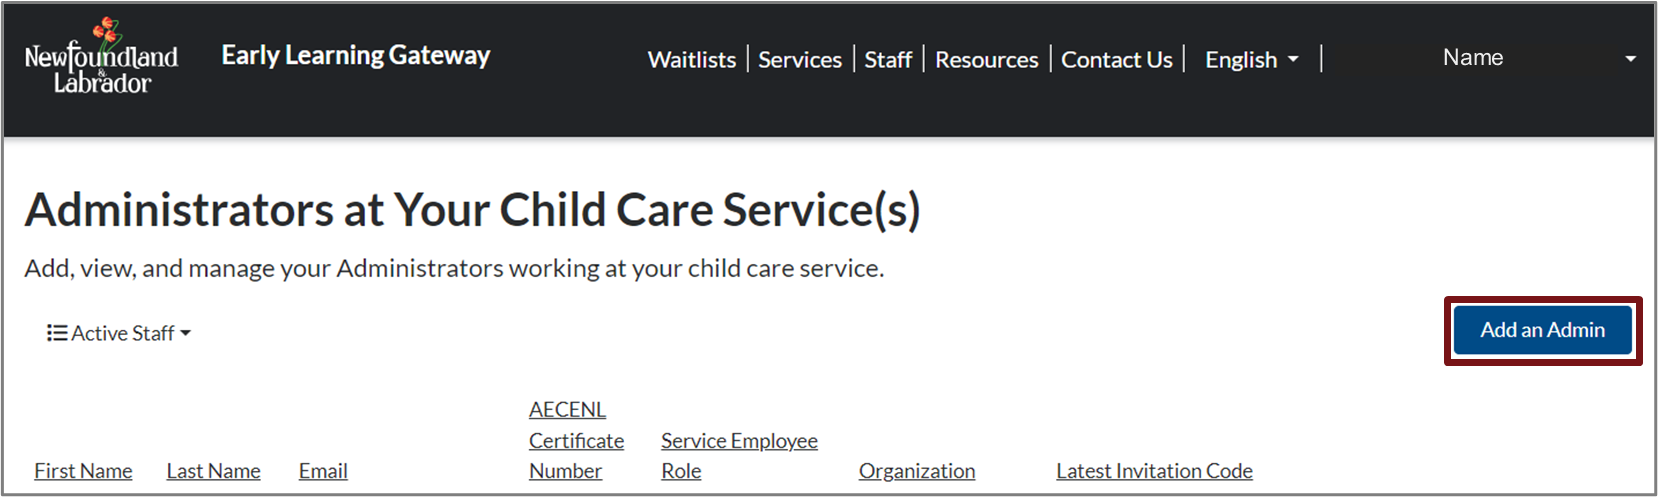
A new Admin Information window will open.
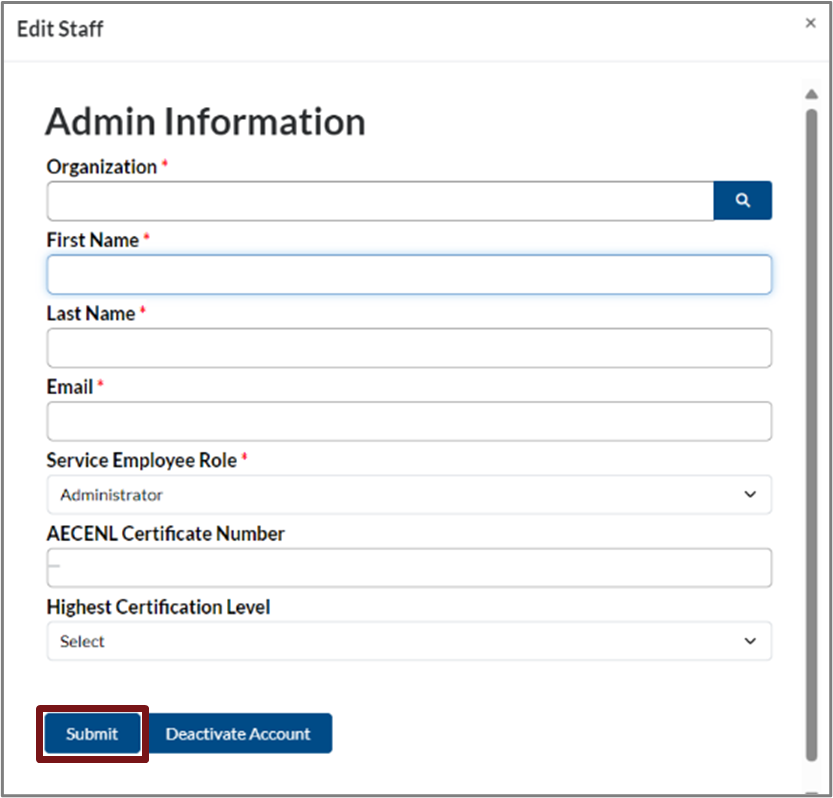
1. Complete the fields on the Admin Information screen and select Submit. Please note: Fields marked with an asterisk (*) are mandatory.
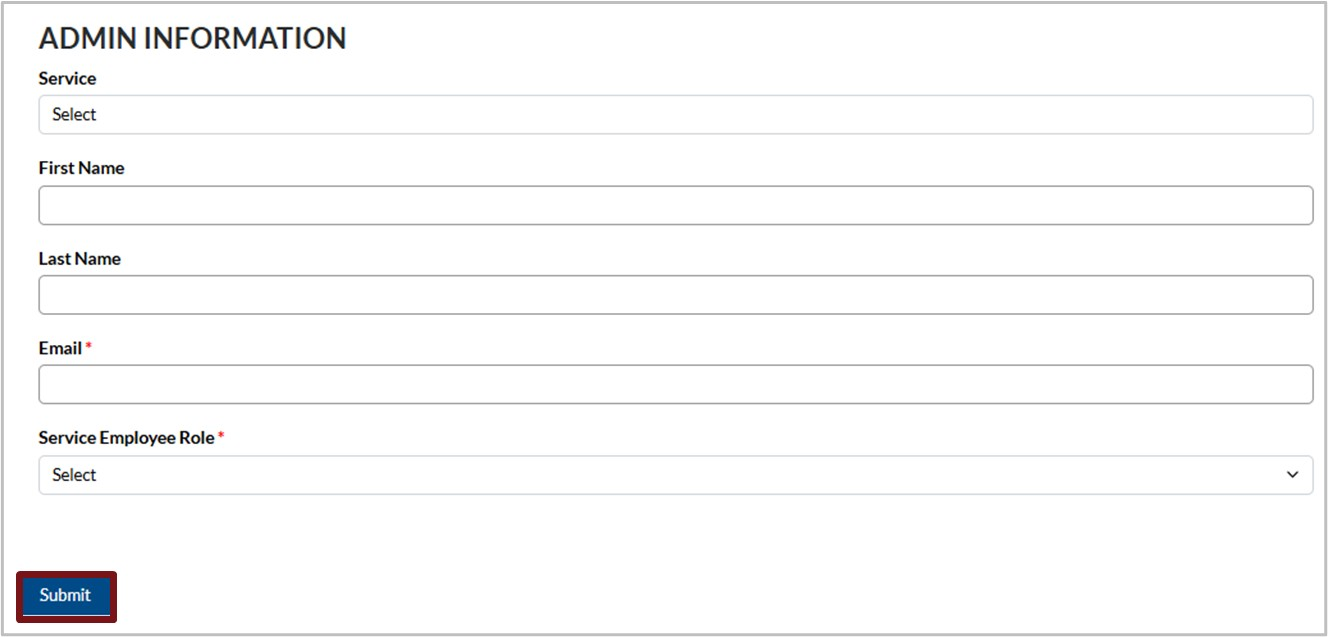
2. The new admin account will display in the list under your Staff. If the admin you have added manages waitlists for multiple services, you can assign them to additional services by clicking the down arrow next to their name and select Edit Staff Member.
3. In the next window under the Related Services section click Add Service.

4. Click in the Service field and select the applicable service from the list provided.

5. Continue to click Add Service until all required services have been assigned to the admin.
6. Click Submit and proceed to Generate Invite Code.
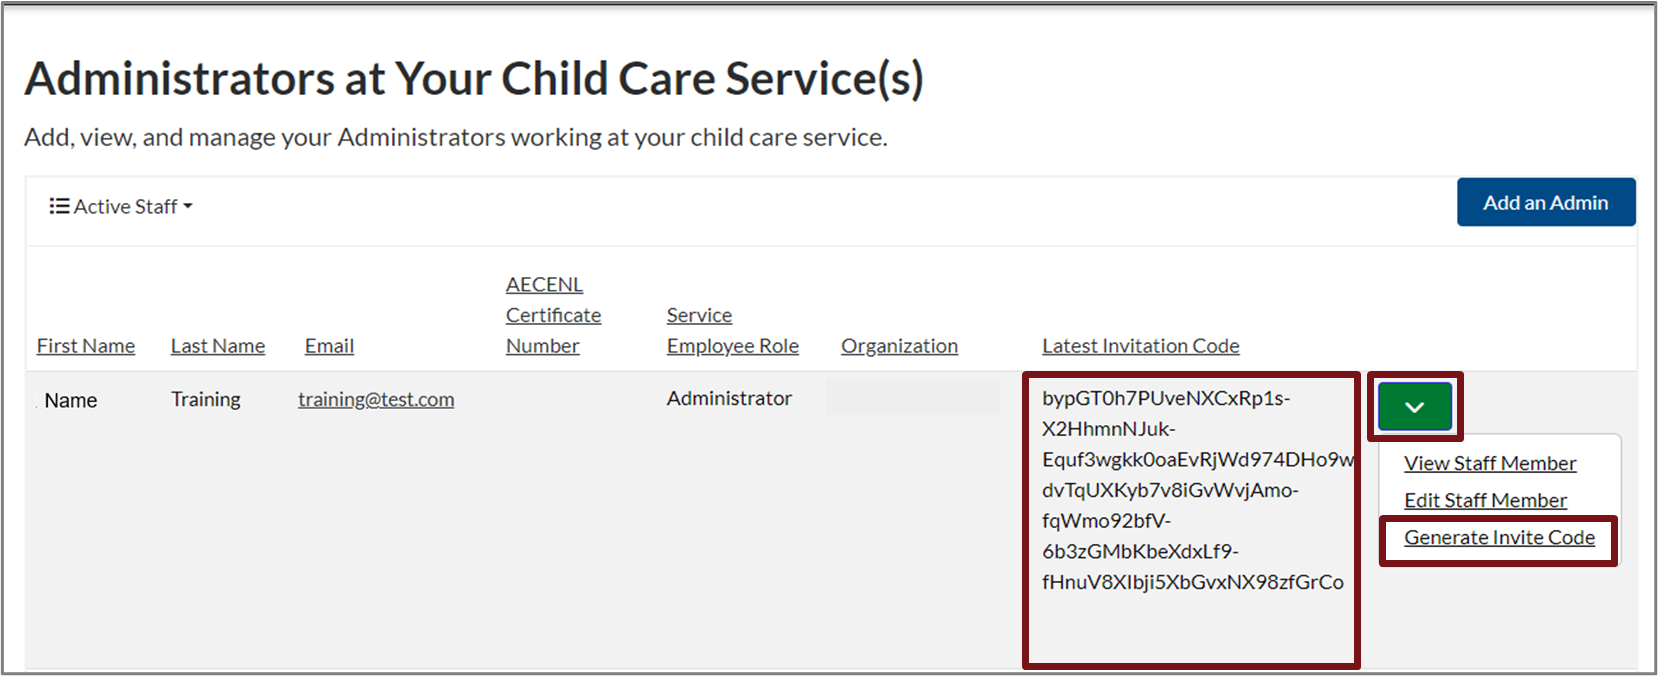
Generate Invite Code
You can generate an invite code for your admin to create a username and password for the Early Learning Gateway Service Portal.
Select the down arrow ![]() next to the admin, then click Generate Code. The Invitation code will appear under the Latest Invitation Code heading. Copy this code and paste it into an email or text to send to your admin. Inform your admin to follow instructions to redeem an invite code to create a username and password.
next to the admin, then click Generate Code. The Invitation code will appear under the Latest Invitation Code heading. Copy this code and paste it into an email or text to send to your admin. Inform your admin to follow instructions to redeem an invite code to create a username and password.
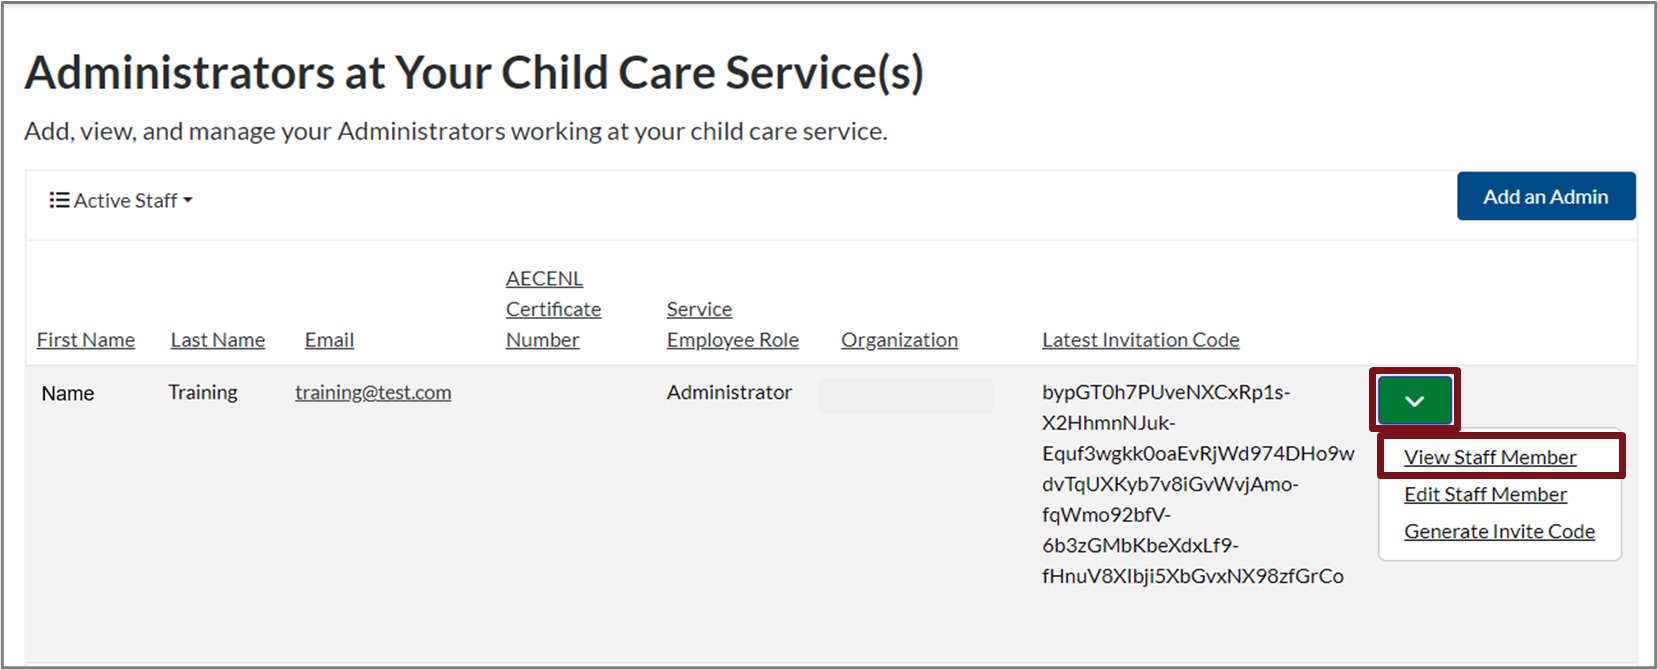
View an Admin Account
To view an existing admin, select the down arrow ![]() next to the admin. Click View Staff Member.
next to the admin. Click View Staff Member.
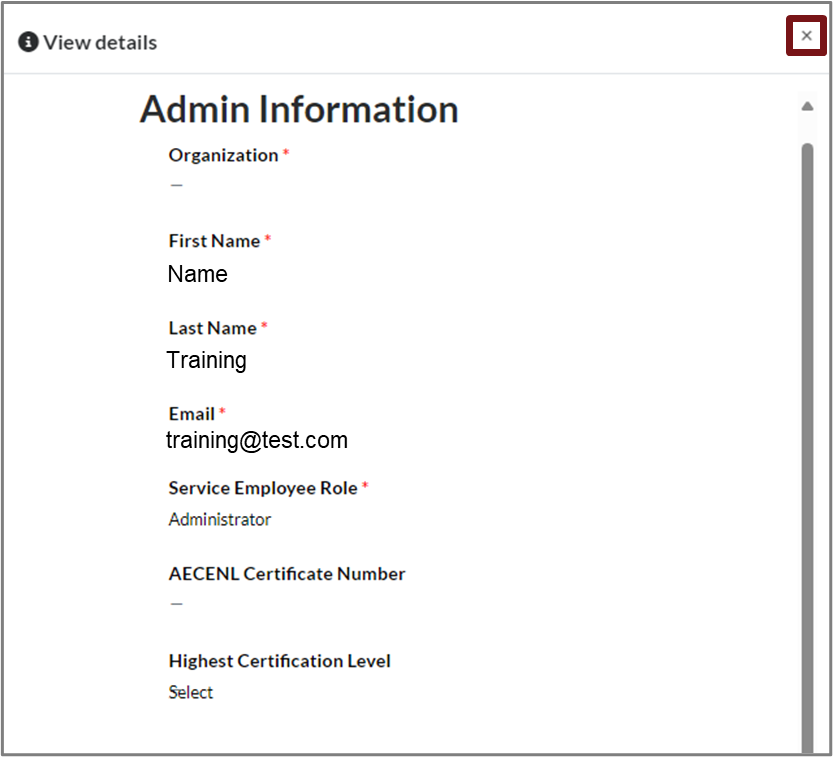
An admin information window will open. To close the details window, click the X at the top right of the window.
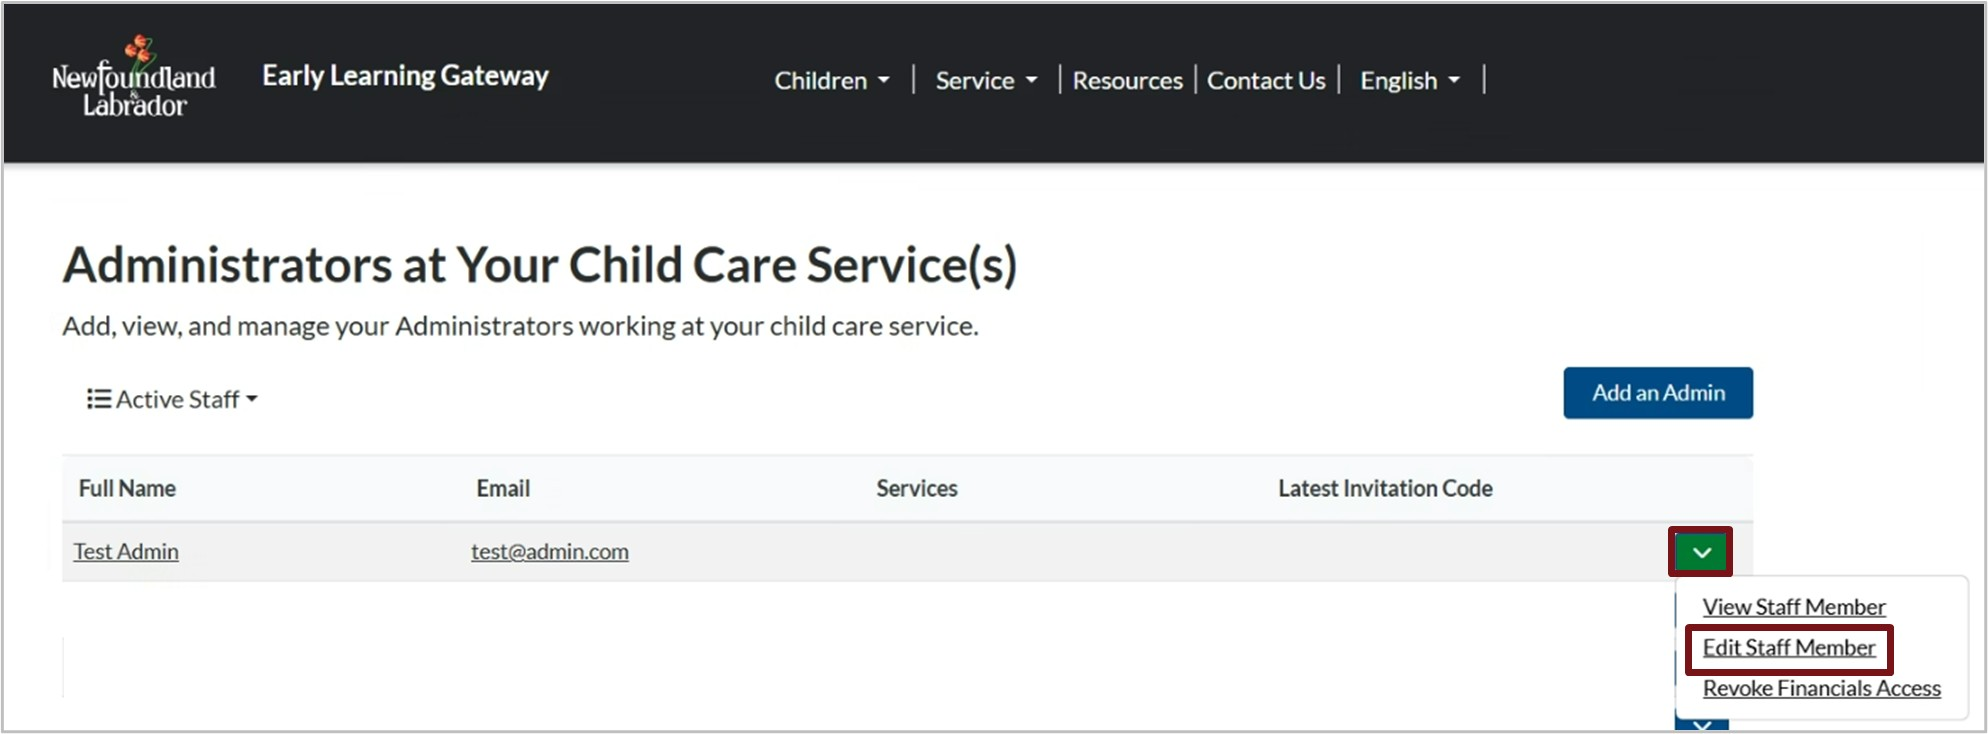
Edit an Admin Account
To edit an existing admin account, select the down arrow ![]() next to the admin. Click Edit Staff Member.
next to the admin. Click Edit Staff Member.
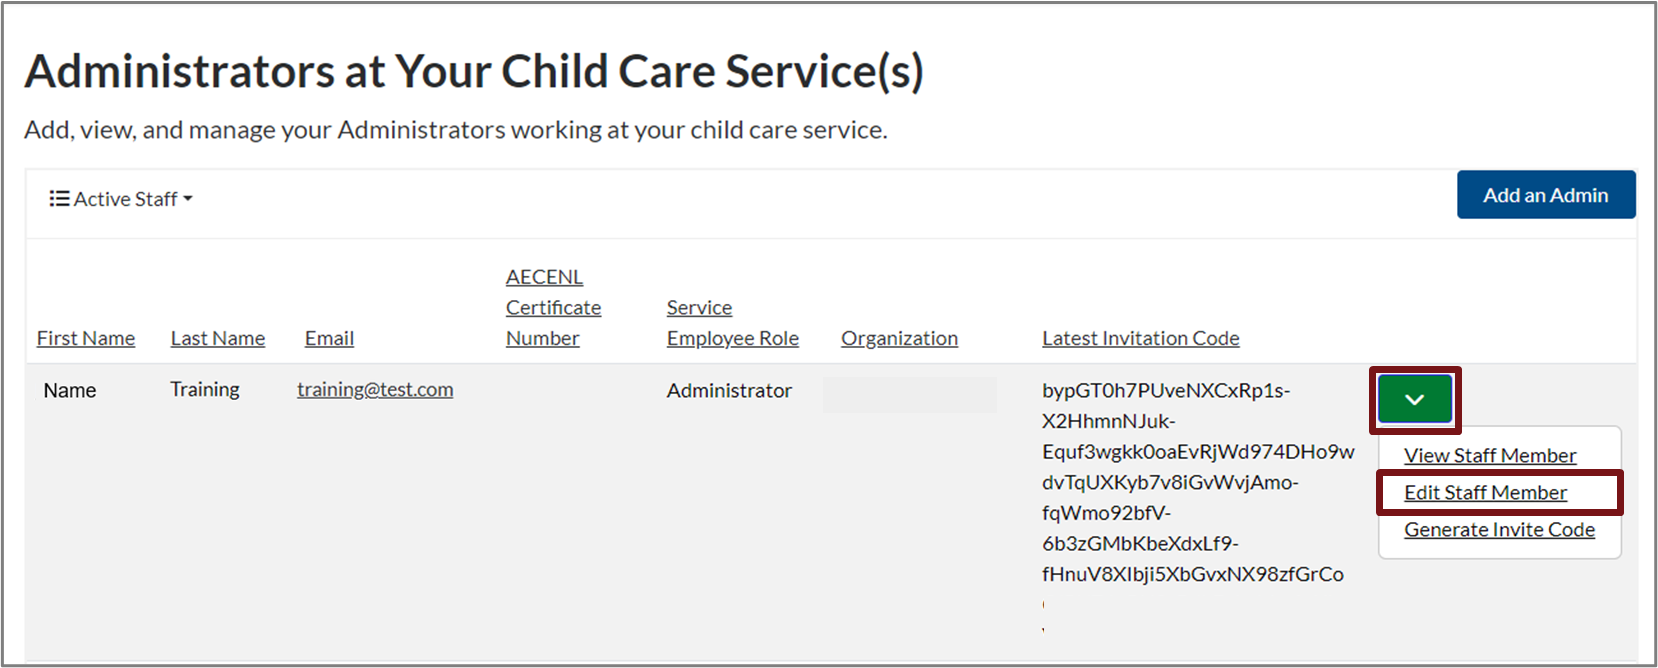
An admin information window will open. Edit the fields, then click Submit.
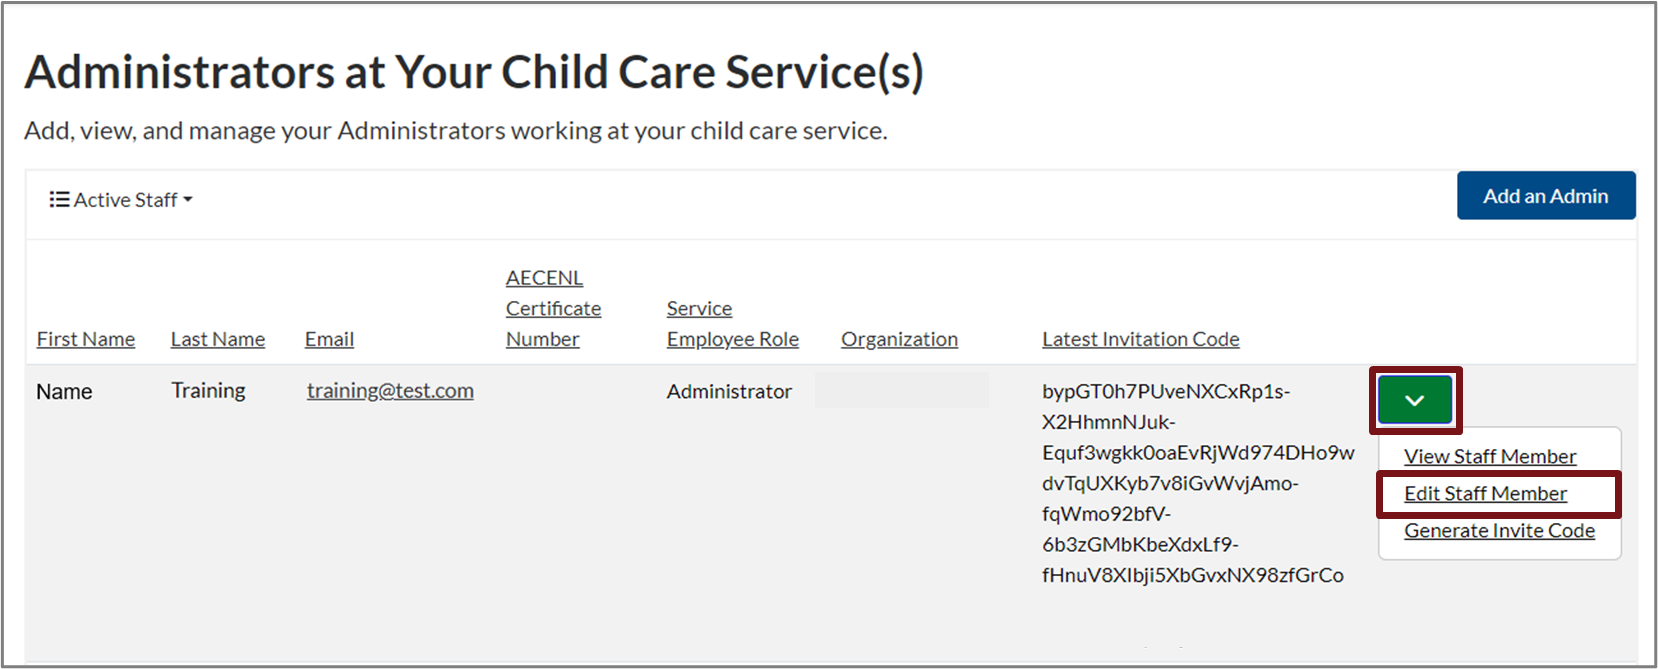
Deactivate an Admin Account
To deactivate an existing admin account, select the down arrow ![]() next to the admin. Click Edit Staff Member.
next to the admin. Click Edit Staff Member.

An admin information window will open. Click Deactivate Account.

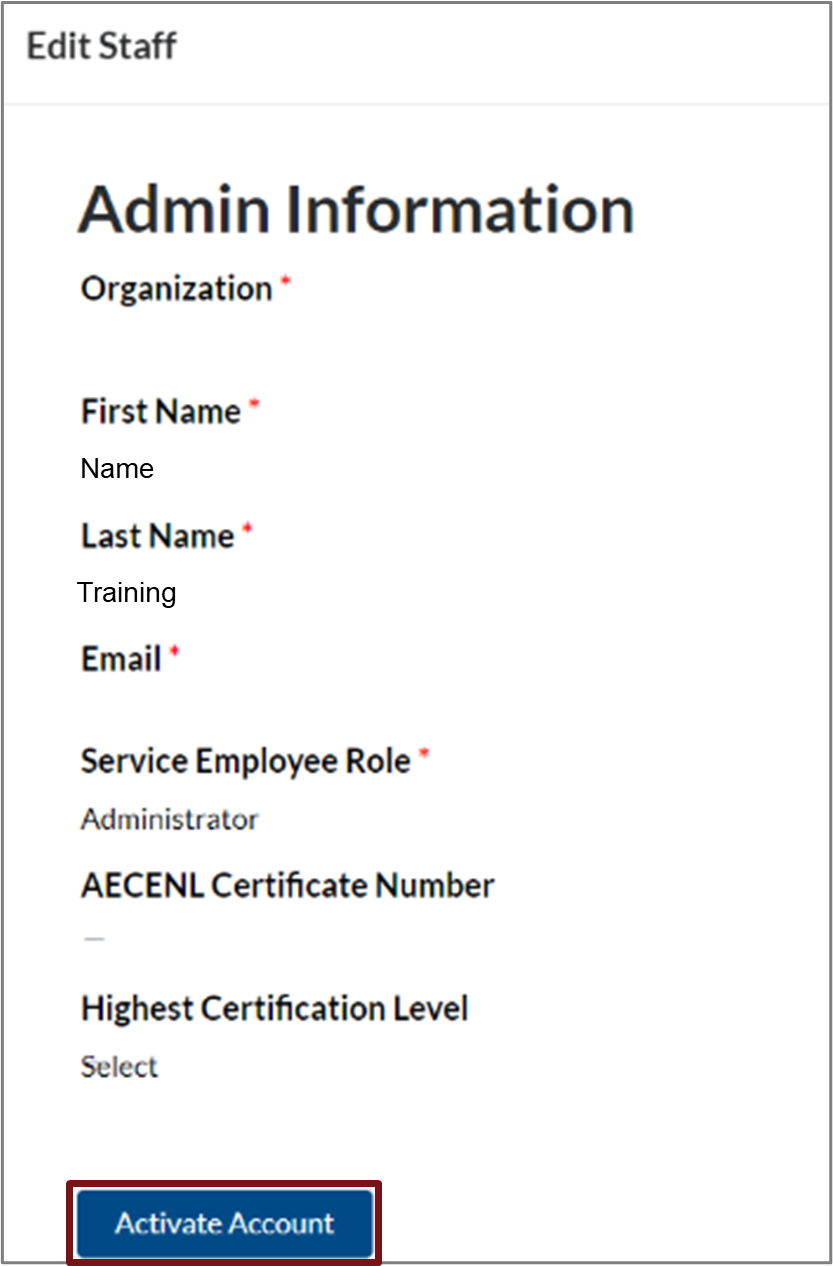
Activate an Admin Account
To activate an existing admin account, select the down arrow ![]() next to the admin. Click Edit Staff Member.
next to the admin. Click Edit Staff Member.
An admin information window will open. Click Activate Account.
ECE Substitute
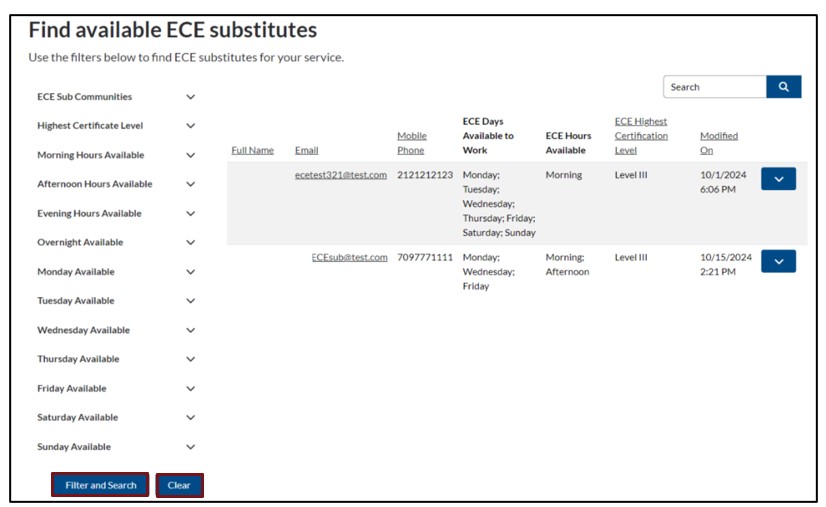
Click the Personnel button at the top of the Early Learning Gateway Service Portal, then select Available ECEs. The list of ECEs registered as substitutes in the Early Learning Gateway will appear here.
If using a mobile device, click the menu icon ![]() at the top right of the screen, then select Personnel and Available ECEs
at the top right of the screen, then select Personnel and Available ECEs

Filter and Search for Available ECE Substitutes
You can filter and find the available ECE substitutes using the search criteria. Simply click the drop-down menu, select the criteria you want to see, and then click Filter and Search. To reset your filters, click Clear.
Please note: When an ECE completes their registration in the Early Learning Gateway, it is submitted to AECENL for review and approval. Once approved, the ECE will be added to the list of ECE substitutes for regulated child care services in the Early Learning Gateway. The child care service will verify requirements and any supporting documents with a ECE and will use their existing hiring practices prior to confirming work in the child care service.
View ECEs Details
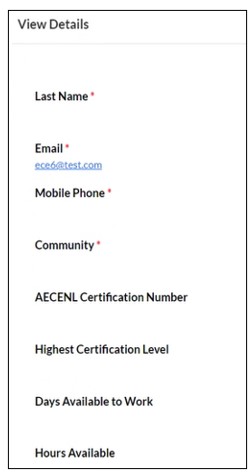
Click the down arrow ![]() for an ECE entry and select View ECEs Details.
for an ECE entry and select View ECEs Details.
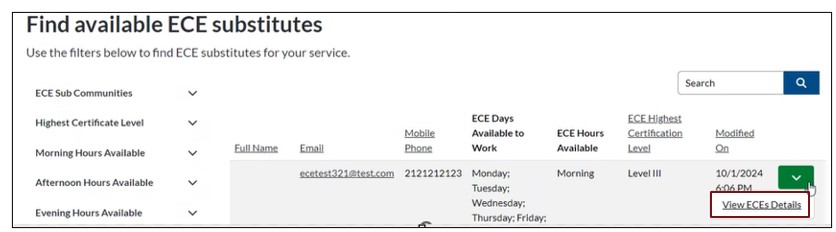
A View Details window will open displaying the ECEs information. To close the window, click the X button in the top right corner.
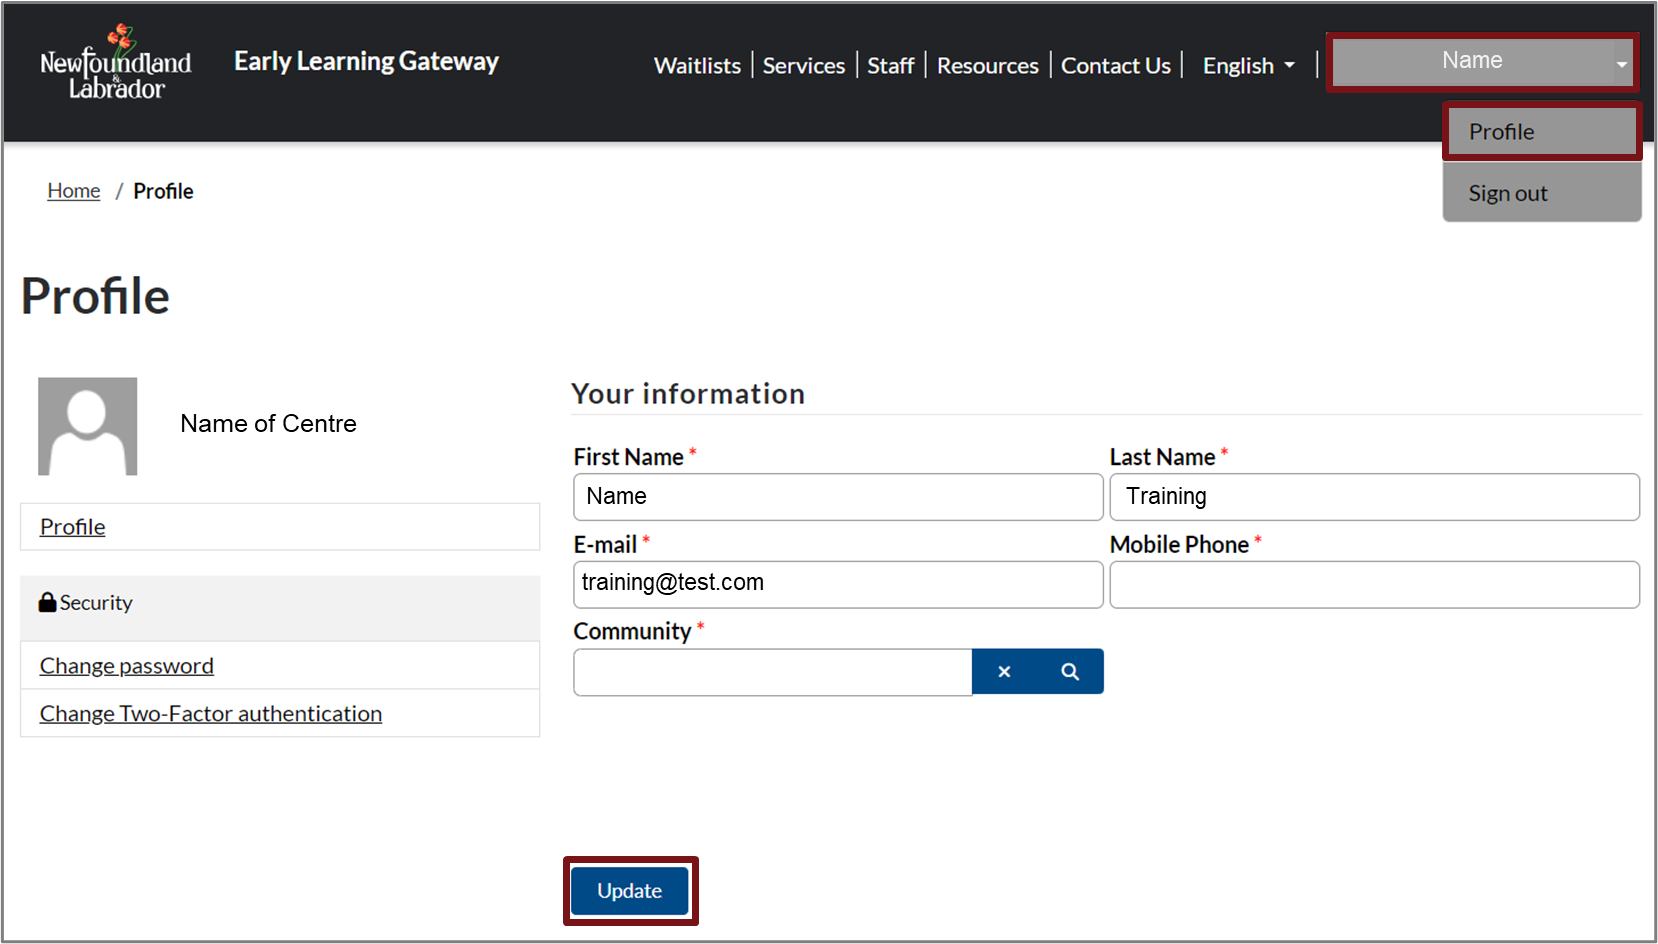
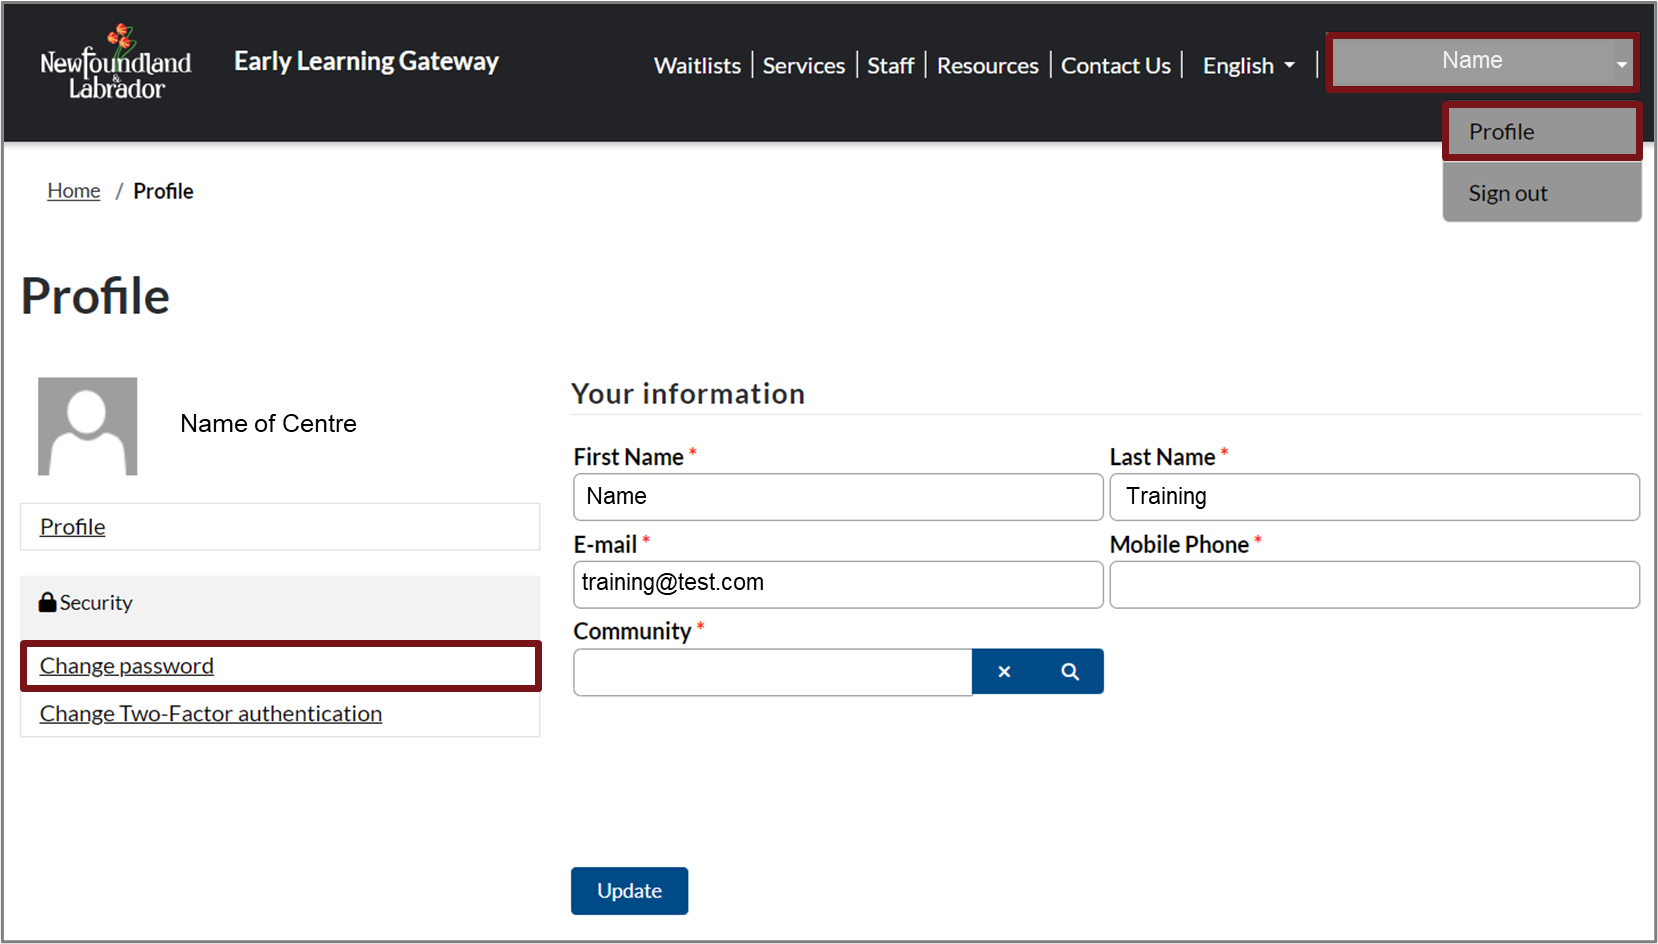
Your Profile
To update your profile, select your name in the top right corner, then click Profile.
If using a mobile device, click the menu icon ![]() at the top right of the screen.
at the top right of the screen.
Proceed to enter your information, then click Update.
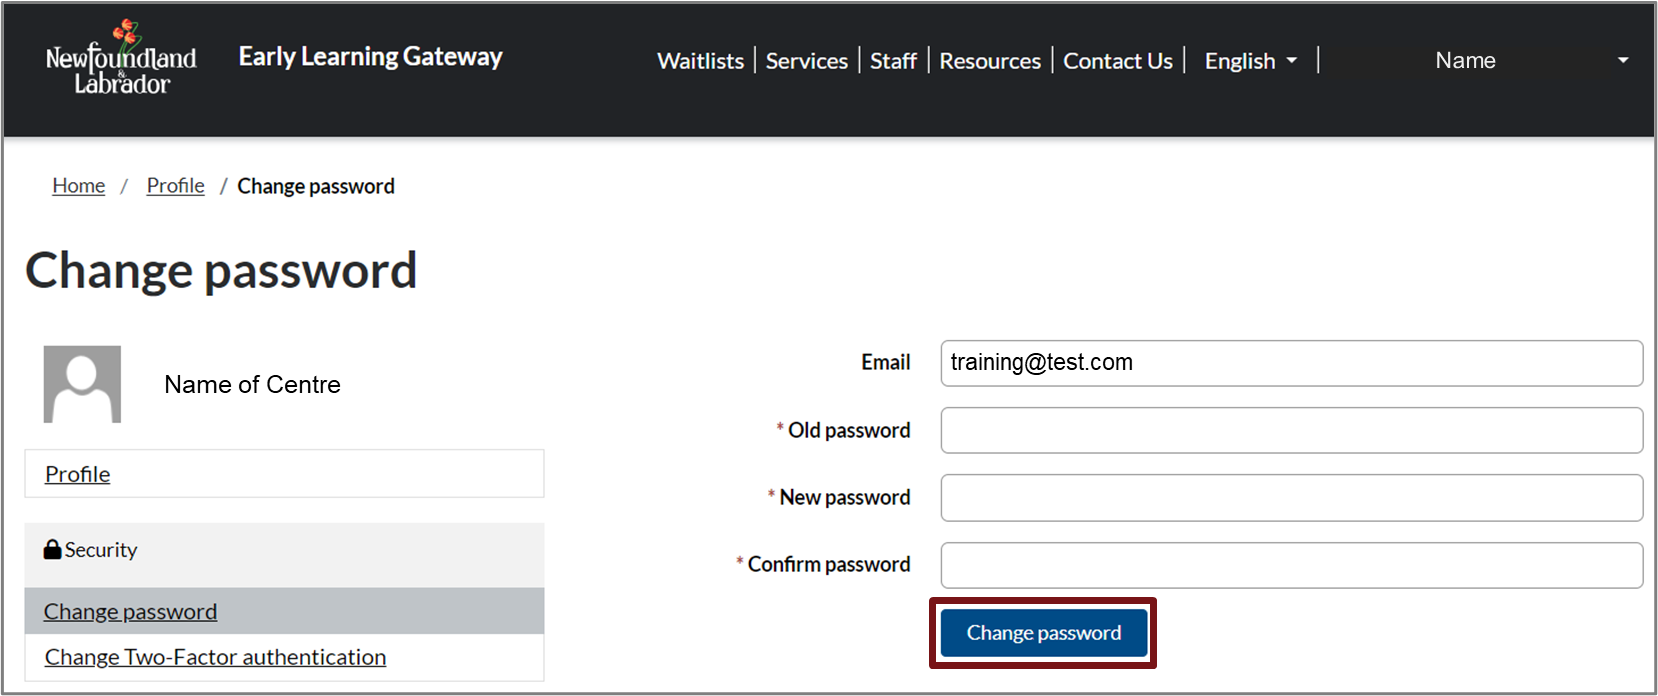
How to Change Your Password
To change your password, sign into the Early Learning Gateway Service Portal, click on your name in the top right corner, then select Profile. If using a mobile device, click the menu icon ![]() at the top right of the screen. Select your name, then click Profile. Select Change password.
at the top right of the screen. Select your name, then click Profile. Select Change password.
Complete the fields, then click Change password. Please note: Fields marked with an asterisk (*) are mandatory.
Resources
To view Frequently Asked Questions, Resource Guides, and our Service Portal Video, please click Resources at the top of the Service Portal. You will be re-directed to the Early Learning Gateway Resources page.

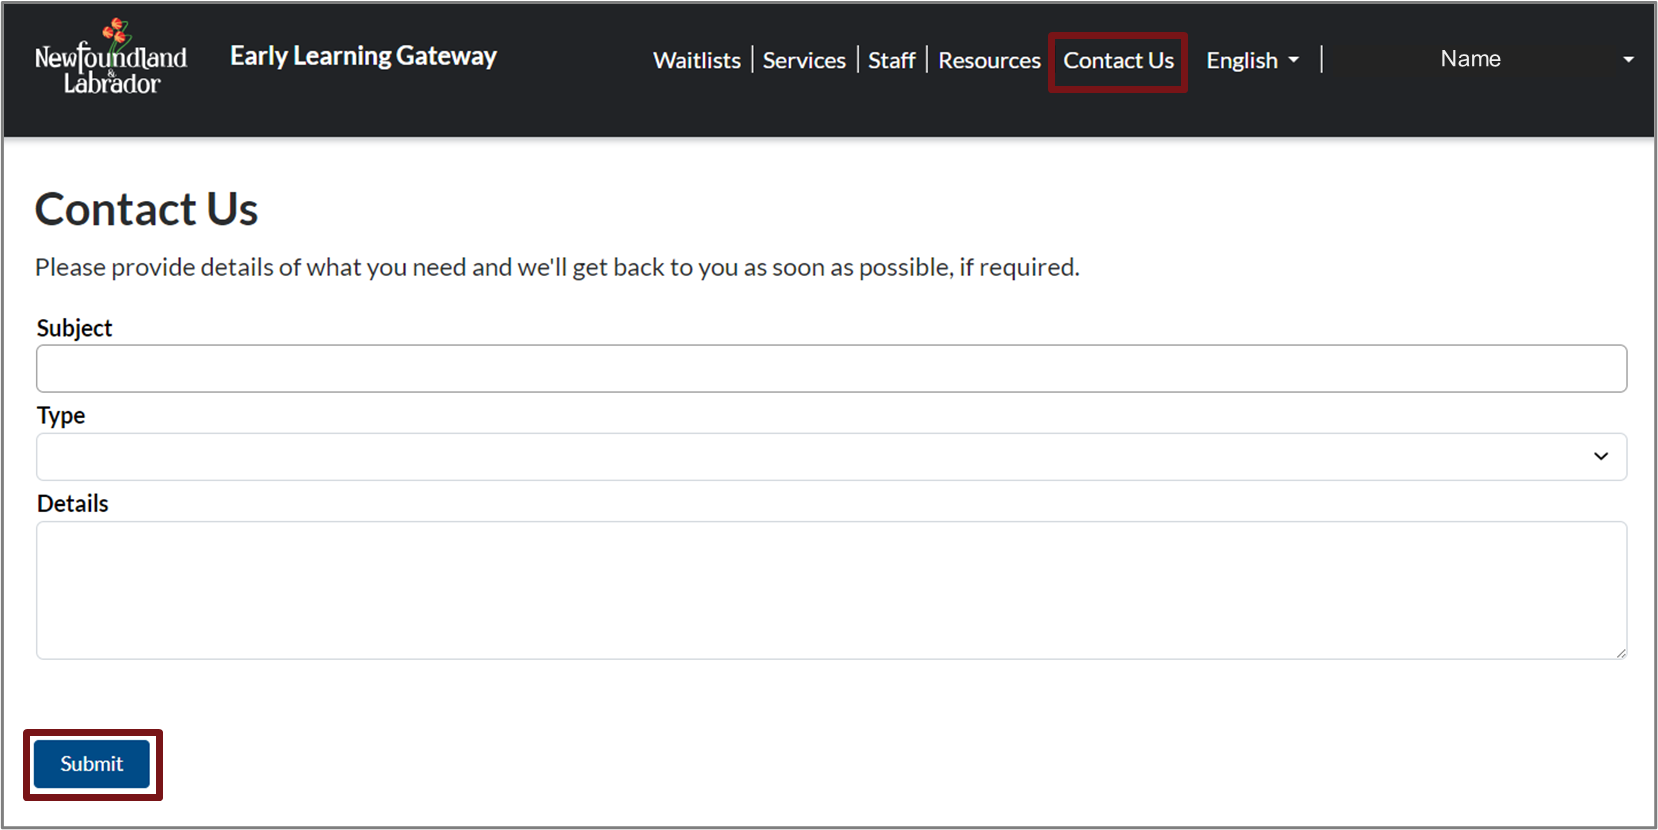
Contact Us
If you have a general inquiry or require technical support for the Early Learning Gateway, you can contact the Department of Education at elgateway@gov.nl.ca or use the Contact Us feature.
To can utilize the contact us feature, please select Contact Us at the top of the Service Portal. Complete the fields and click Submit.
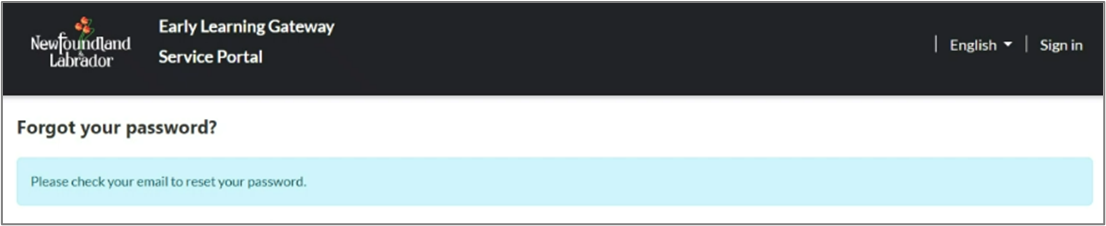
Forgot Your Password
If you forget your password, please select Forget your password on the Early Learning Gateway Service Portal Sign in screen.
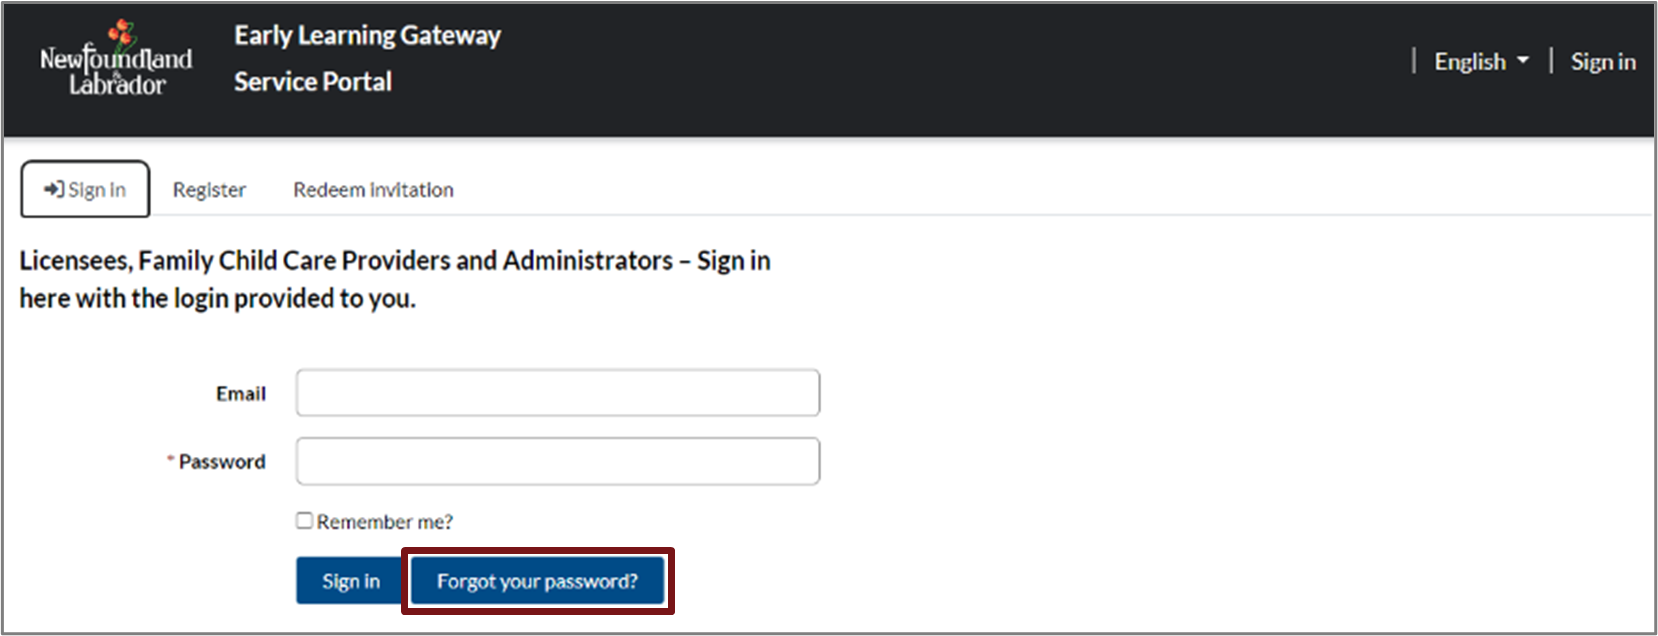
Enter your Email then click Send.

You will receive a notification prompting you to check your email to reset your password.
How to Sign Out of the Early Learning Gateway?
To sign out of the Early Learning Gateway Service Portal, click your name, then click Sign out.
